Showing posts with label java. Show all posts

Sunday, February 2, 2014

cheat’s Q&D Hadoop 0.23.6 install guide

[CC] cheat’s Q&D Hadoop 0.23.6 install guide
Hadoop is one of the most popular open source “Cloud Computing” platforms that is used to crunch massive amount of data on generic hardware (computer hardware that is non-proprietary and not necessary has to be identical). It is not exactly “Cloud Computing” per se, because it is a computing architecture that is meant for processing massively large amount of data in parallel. Taxonomically, Parallel Computing (the predecessor to cloud computing) would be the closer terminology. Hadoop comes with several features, most notably the HDFS (Hadoop File System), and MapReduce.  I attempt to describe HDFS, and MapReduce in a one liner. HDFS: it is an open source cousin of GFS (Google File Systems), provides a framework to manage data redundancy, and most importantly the scalability is as simple as adding more generic hardware. MapReduce: it is a programming model for processing very large amount of data that leverages on the classic computing method: the divide and conquer approach through the Map stage follow by the Reduce stage. On top of that, it performs sorting intrinsically via the programming model. Oh wait… I busted my one liner quota for MapReduce.
Back in late 2012 I have followed the text book example and played with Hadoop 0.20.0. Setting up and Installation is a breeze, due to the fact that many user guide and tutorials that are made available by the community. In early 2013, Hadoop 0.23.6 come by and I assumed the installation is going to be identical to the earlier version, but I was wrong. As a matter of fact, I have used some nonstandard way by the tree command to find the changes in directory for the necessary configuration files. If the version documentation rocks at that time, it will really save me some of my hair.

Hadoop 0.23.6 is an interesting release. In this version, several major changes/overhaul are made. Most notably, the API call of HADOOP.MAPRED is deprecated and superseded by HADOOP.MAPREDUCE aka
MRv2. Resource management of a Hadoop Cluster was relegated to a dedicated service named YARN. Several advanced data structures meant for programming MapReduce were added; some were deprecated (I will go into the details of implementation in the future posts).
For a complete genealogy of Hadoop versions, check
this out.
This install guide assumes
  1. Ubuntu server 11.x on a VM; I have used 40GB for a start, but run out very quickly.
  2. Hadoop 0.23.6 in releases
  3. Java 6 openJDK
  4. Hadoop cluster lives as a single node
Several things to take note prior to running Hadoop. Locate the directory of configuration files; differentiate between datanode and namenode; dedicate a “Hadoop user”; necessary files permission on the directories; HDFS is not your regular file system, it requires a separate software to access; Hadoop starts with a daemon;

Step1: Download Hadoop and extract it to a directory.
Then name of the directory with the files extracted shall be used in all of the following config. E.g I have created a folder “/usr/local/hadoop” and the files are extracted in it.
Step2: Locate the configuration templates, and directory to place the configurations
#template
/usr/local/hadoop/share/hadoop/common/templates/conf
#path to place configuration files
/usr/local/hadoop/etc/hadoop
Step3: create directory for temporary files, logs, namenode, and datanode
/usr/local/hadoop/data/hdfs/datanode
/usr/local/hadoop/data/hdfs/namenode
/usr/local/hadoop/data/hdfs
/home/user/hadoop/tmp
#output for hadoop logs
/user/user
Step4: copy example configuration templates to config directory and then edit the configuration files.
Configuration files needed are “yarn-site.xml;core-site.xml;hdfs-site.xml;mapred-site.xml”. Put in the parameters as per required in to the configuration files mentioned above. A sample of the configured configuration files are available to download here.
Step5: add the necessary paths and verify the paths
#path to add to ~/.bash
$JAVA_HOME=/usr/lib/jvm/java-6-openjdk
$HADOOP_HOME=/usr/local/hadoop
# update the paths
source ~/.bash
#Verify  the paths
#output should be similar to the following
share/doc/hadoop/api/org/apache/hadoop/examples
/usr/local/hadoop/hadoop/hadoop-0.23.6/share/doc/hadoop/api/org/apache/hadoop/examples
/usr/local/hadoop/share/hadoop/hadoop-0.23.6/share/doc/hadoop/api/org/apache/hadoop/examples
/usr/local/hadoop/share/doc/hadoop/api/org/apache/hadoop/examples
/usr/local/hadoop/share/hadoop/hadoop-0.23.6/share/doc/hadoop/api/org/apache/hadoop/lib
/usr/local/hadoop/share/hadoop/hadoop-0.23.6/share/hadoop/mapreduce/hadoop-mapreduce-client-core-0.23.6.jar
/usr/local/hadoop/share/hadoop/hadoop-0.23.6/share/hadoop/mapreduce/hadoop-mapreduce-client-common-0.23.6.jar
Step 6: Format name node
Warning: this step only requires to be done ONCE for each newly setup cluster. Executing this command on an existing cluster will risk data loss.
#do once only, at the initial setup of hadoop
bin/hadoop namenode –format
Step 7: Start the daemon for Hadoop
sbin/hadoop-daemon.sh start namenode
sbin/hadoop-daemon.sh start datanode
sbin/yarn-daemon.sh start resourcemanager
sbin/yarn-daemon.sh start nodemanager
sbin/mr-jobhistory-daemon.sh start historyserver
Step8: verify Hadoop cluster with jps
Assumed that the setting up and configuration went fine, the following screen will appear after typing the command “jps”.

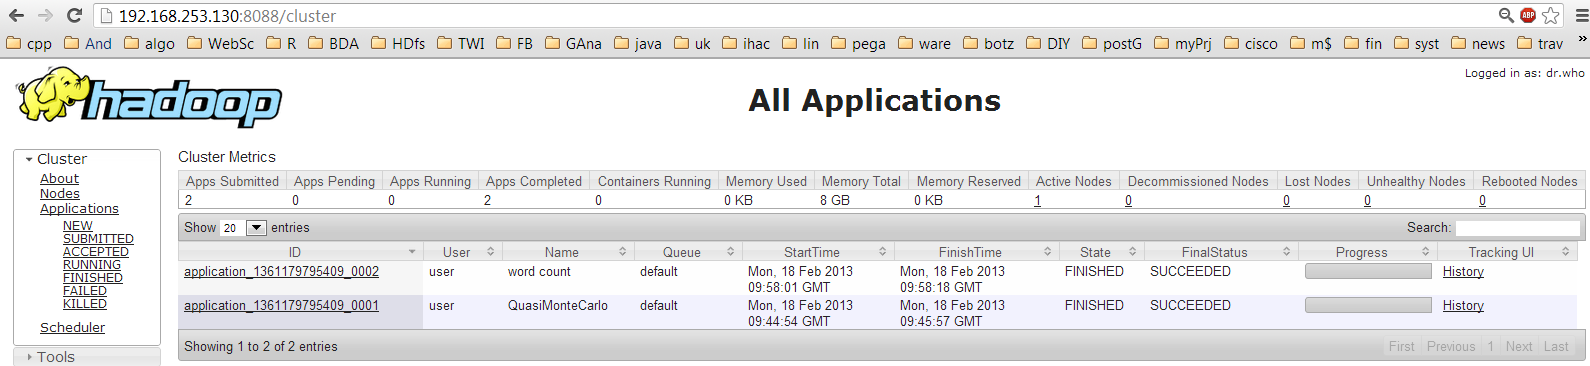
Step9: verify Hadoop cluster with web based consoles
Note: 192.168.253.130 is the IP address of my Ubuntu server.
#namenode console to verify o/p
#for ResourceManager
#for Job History Server
Step10: Verify Hadoop & MapReduce in action
run example word count
#copy text files from “/home/user/upload” to HDFS directory “/user/user/txt”
bin/hadoop dfs -copyFromLocal /home/user/upload /user/user/txt
bin/hadoop dfs -ls /user/user/txt
bin/hadoop jar share/hadoop/mapreduce/hadoop-mapreduce-examples-0.23.6.jar wordcount /user/user/txt /user/user/txt-output
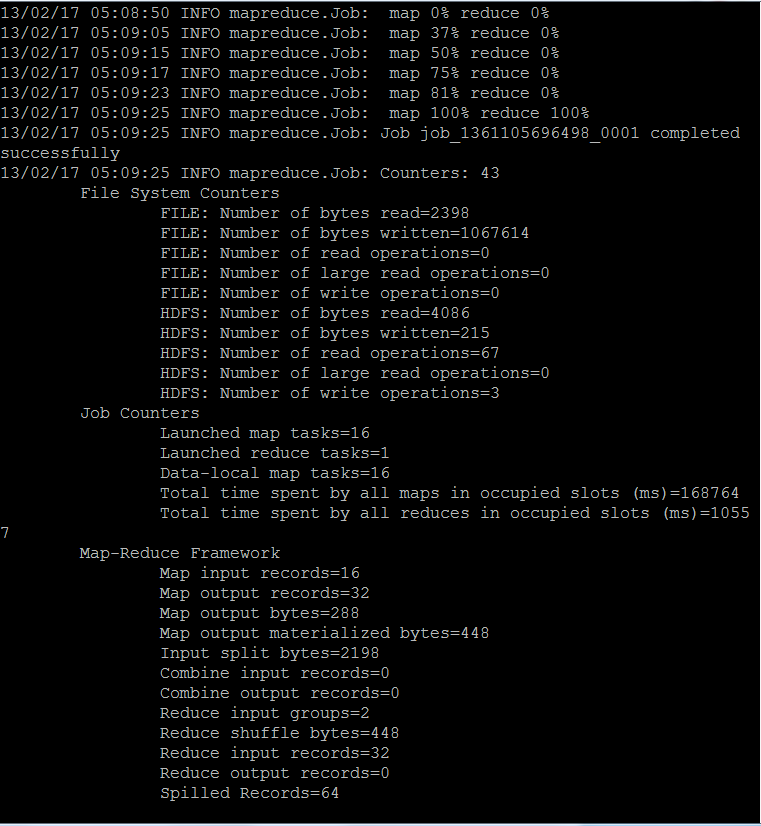
calculate pi
#run an example calc pi
bin/hadoop jar share/hadoop/mapreduce/hadoop-mapreduce-examples-0.23.6.jar pi -Dmapreduce.clientfactory.class.name=org.apache.hadoop.mapred.YarnClientFactory -libjars share/hadoop/mapreduce/hadoop-mapreduce-client-jobclient-0.23.6.jar 16 10000
Compile a custom word count in java with MapReduce on Hadoop 0.23.6
#to compile
javac -classpath /usr/local/hadoop/share/hadoop/hadoop-0.23.6/share/hadoop/common/hadoop-common-0.23.6.jar:/usr/local/hadoop/share/hadoop/hadoop-0.23.6/share/hadoop/common/lib/commons-cli-1.2.jar:/usr/local/hadoop/share/hadoop/mapreduce/hadoop-mapreduce-client-common-0.23.6.jar:/usr/local/hadoop/share/hadoop/mapreduce/hadoop-mapreduce-client-core-0.23.6.jar -d classes WordCount.java && jar -cvf wordcount.jar -C classes/
#to execute
/usr/local/hadoop/bin/hadoop jar wordcount.jar org.myorg.WordCount /user/user/txt /user/user/bigram-output

Verify output with
/usr/local/hadoop/bin/hdfs dfs -ls /user/user


Friday, November 15, 2013

sixpence 3D scanning kit

While I was spending my summer in London typing away on my thesis. One of my extra curricular activities was to pop over next door Institute of Making to make some interesting stuff. At one of the workshops, we did some 3D scanning using both open source such as reconstructme + kinect, and also proprietary solution, the Next Engine. Scanning a human object using the kinect at the absent of a scanning rig is really tiresome. Holding the laptop, the kinect, and power supply circling the subject at incremental steps is tedious. Nonetheless, here I present to you: yours truly in meshlab.


Over the weekends, I thought of an idea of making dirt cheap 3D scanning with existing items. What I mean existing items, are items on my desk such as an android mobile phone, arduino, and servo. While researching on cloud computing and it's application, I discovered a really cool website http://apps.123dapp.com/catch/ that leverages on cloud computing to generate a 3D model based on multiple pictures of an object. Taking (at most 70) pictures of an object at 360 degrees manually without a rig is really tiring. So, my weekend project for the 3D scanning kit to automatically take pictures at 360 degrees of a subject without human intervention; can be decomposed to 4 sub parts. part1: I need a turntable of some sort to rotate my subject 360degress. part 2: There must be some sort of communication channel between my turntable and the picture taking apparatus. part3: picture taking apparatus must be capable of receiving commands. part4: upload pictures to 123D catch to generate the 3D model.

part1: turntable
turntable with subject container

manually to take pictures
if you wonder what is the pen doing there


Parts needed. An arduino, full rotation servo, code.
The full rotation servo (FRS) I got on hand was picked up from a rubbish dump. Upon testing, it is still functioning, how lucky. Here comes the interesting problem. With the use of the example code of sweep from arduino, the FRS is behaving erratically. It does not stop exactly at 15 degrees and continue to spin. Reason being, the servo is modified; the "horn" on a gear inside the servo is broken off. tough luck using standard code. So, I have to come out with a scheme to stop the FRS at every 15degrees via code.

As for the container of the subject. I have used newspaper to create the background for the subject. Such that when the 3D model generating algorithm is running, the patterns on the newspaper can be used as the reference point. That is according to the guide of the 123D catch.

Part2: communication
parts needed: android device (API level 17 onwards), OTG cable
Reluctant quite I am, to purchase a bluetooth shield for arduino for communication. Furthermore, I am using an android phone running android 4.3 (API level 19). In this particular version, it supports direct USB connection from say a keyboard or mouse to the android phone via microUSB or OTG cable ( USB typeA female to microUSB male). It is much more cost effective for me to use OTG than the bluetooth shield.

A quick look at the opensource community, I stumble upon this github https://github.com/dtbaker/android-arduino-usb-serial i believe was forked from https://code.google.com/p/usb-serial-for-android/. Many thanks to the open source contributors for allowing me to quickly try out code for USB serial from android <--> arduino. Just a point to note, the baud rate for the android is 115200, so arduino must setup serial at the same baudrate. 

combining part1 and 2, I have devised a scheme for my 3D scanning kit. Arduino turn the turntable every 15degrees, send ASCII characters to android device to signal for taking a picture
The code for arduino is here 
Another point to note: print out the serial data received on android to prove the assumption that it is going to be the same as per received on hyper terminal. I learnt it the hard way.

Part3: multiple picture taking on android device without human intervention.

There are excellent tutorials such as this and this for writing manual code to use the android device's camera to take ONE picture. Having wrote my last android app from scratch on my HTC magic, android 1.6 (API level 4), I assumed that I would have not any issues using the API for android 4.3 (API level 19). Besides that, having use MIT app inventor for mockup and POC without writing code from ground up, and using the standard features following the standard methodology; left me jaded when it comes to developing android app.

The SOP for taking a picture on android device via camera API is quite straightforward. Create an activity. Add a button to listen to a an event to take a picture. Add a view to the frame layout for the preview from the camera. Save the picture to the device's memory. After picture is taken, refresh the preview. I assumed that I would only spend 4 hours max after office hours to write a piece of code that would automatically take multiple pictures without user intervention (nobody click on the button to take picture). Little did I for see I would stare at the code for a few nights, wrestling with the android code framework finding out where are the crashes; due to the nature of pictureCallBack(), onPictureTaken(), and refresh preview were supposed to be used. The experience and amount of code I have tried to challenge my assumptions such as race condition, critical section, multi threading that I thought might be the root cause of the crashes warrant for a lengthy post by itself.

Nonetheless, after staring and experimenting for few nights straight, i present to you The code of this android app that is hosted on github

Part 4: upload pictures to 123D catch

Combing part1,2,3, setup a stand for the android device to take pictures.

copy the 31 images from android phone to be uploaded to the 123D catch

Generate a 3D model from the pictures uploaded

Note: no model generated (I got a blank screen after the supposed completion of 123D catch[online]), and I have waited close to 30min to save the project, but without success.
Edit: I have tried to take a few shots of the same subject manually and upload to 123D catch, just to prove my assumption (pictures taken by my app is not usable) is wrong. Surprisingly, no models generated too. really weird

Some fine tuning is required: I noticed the picture taken by my android device was out of focus. Maybe that is the reason why the model was not generated. pictures generated from sixpence 3D scanning kit do work!

Edit: I placed my subject too close to the lens, hence the depth of field caused the blurry images akin to blur subject and clear background. I am still trying to find the API that allows for macro mode auto focus.

Edit: For some weird reasons, 123D catch online version does not work on my laptop. I have left it running over night and the next day I check my computer, still no model generated. However, the 123D offline version does work, using the pictures generated by sixpence 3D scanning kit.
uploading pictures
processing the capture into 3D model
sitting there looking pretty


THIS IS SPARTAAAAAAAAAAAAA!!!!


A quick view in meshlab. further manipulations are needed before 3D printing. For starters, the newspaper background got to go.


update:
the 3D model opened in meshmixer. the news paper portion is selected and then deleted by pressing key "x"


there are a few gaps need to be fixed in the edited 3D model before it can be printed.

the 3D model is edited into a watertight model, ready for the 3D printer.
the 3D printed model


Sunday, November 3, 2013

Story of 2 Folder (Android Development)

On Eclipse toolbars-> Windows -> Android Virtual Device -> Create new AVD

Some how the newly created AVD refuse to start, with error message, PANIC: cannot not start android-virtual-device-name

A quick hack to fix this problem of PANIC android virtual device can't start is included as per the screenshot.

Tuesday, January 29, 2013

A walk through on using tweets with Java

Work in progress..... watch this space


Monday, October 8, 2012

Back to School: Java OOP Challenge

Alright guys, in another 1 week time it will be Back to School!!! Exited? Sad? Holidays are too short? forgot what that was taught last semester?

Well, it is always good to keep your practical skills honed, especially those that you need in the new academic semester. *make a guess, what skills are important?  I have this hypothesis that my tech skills will suffer from deterioration over the LONG holidays IF i do not use them. Therefore, I always look for / create some opportunities to make use of my skill set.

I have taught programming Java1 and Java2, and C++ over the last few semesters. I really hope you guys still remember what it takes to write a proper piece of code to solve a certain problem/situation/scenario. Now, I am going to give you guys a head's up before the school starts and hopefully to prevent the whole "new" process of running amok and panicky to learn back on what has been taught and practiced. 

The terms remained the same as per the last challenge. Trust me, the 3 weeks of wait for postage will be not in vain. Hey, you got something from => ME!

The first 3 SP students that responded with your OWN thoughts that were translated into code shall get a post card signed by yours truly and sent via snail mail from London, UK. You need to do a POC (via snipt.net, paste on my Facebook post) + FCFS only.  
If you are a year1 sem2 student or year2 stage B student (minimal programming experience) that attempt at this question and manage to complete it, drop me a message. I will make sure you will get some goodies sent from London!

Now, the question statements

Using OOP concept, design the classes and create a "cmd prompt style" calculator that does the basic operation, e.g add, substract, multiply, division, and with the proper exception handling. The user need to be able to enter this expression "a + b" to operate the software. Next, using the same OOP concept create a ScientificCalculator that adds a new feature of calculating a power to an integer, e.g x^m. Use any language of your choice, Java, C++, Python, etc


the source code is for reference only. You are strongly encourage to write one with your own thoughts (to claim the prize of course!).


Sunday, September 30, 2012

Parsing or Word-Rip Alice-in-Wonderland, A programming methodology

Data need to be parsed very often into a form that is understandable by a software. Data parsing is most familiar with the computer science students, usually, data need to change form among different system. The sample operation below describes the methodology of word ripping the famed novel, Alice in Wonder land to 1. count the number of words and 2. determine word frequency 3. sort the word frequency.

Critical Analyzing the sample problem, and possibly break down this word rip operation into several sub steps. This is the most classic divide an conquer approach. First would be to determine the weapon of choice from the arsenal. Be it C++, C#, Java, Python, Haskell and etc. In this example where there is no preference for the language needed, hence the tie breaker would be the familiarity with the API. Using API definitely reduce the time to market (TTM), then custom writing another whole new library. In my example, Java is preferred.

Next, the "coding" part. Never-Ever-Jump-Straight-In! Give some thought on the process of word rip. Data need to be acquired, data need to be parsed, data need to be stored (in memory , data need to be manipulated and lastly data need to be output to a file physically. AH.... all look so familiar isn't it! At this point of time, locate the possible use of the API and make a mental (or physically writing it down) note about it. This is also the time where UML case and also class diagram can be drawn.

 Assuming the novel could be put into the same directory of the *.class file, this would same some time in programming, i.e, no need to import java.net.* and thus skipping the myriad of networking related troubleshooting for the code to access to the Internet. Reading in the data file, this should be familiar. With the Java.io.File class. The logical next step will be thinking on how to count the number of words (without the punctuation marks), what variables need to be declared and what type of control structure need to be used? Hint* while loop till the end of file, increase the counter for each word found. Compile and Print out. Troubleshoot as necessary.

Congratulations for coming this far. It means that you have completed the first iteration of counting words using next() [which ignoring punctuation marks]. Now, come the interesting bit. How to 1. remove the punctuation mars, 2.store the words 3.count the frequency of the words. Few assumptions need to be made. i.e Word and w0rd; text-ing and texting is 2 unique an etc. item 1 can be dealt separately first, but the choice made for 2. will directly impact the way the code written for 3.

REGEX and greedy comparison. I am assuming you guys are familiar with Java String class API and the replaceAll() method call. Since the need is to rip out the words (alphabets and numbers), minus the punctuation marks. I started with the most classic one replaceAll("[^A-Za-z]", "");  on close examining of the processed outputs, there are a few missed bits and blobs of punctuation mark remained. From the output, it will be naked to the untrained eye (on what need to be spotted). Do look out for patterns, such as repeating type of punctuation marks, syntax (format) of the words that fall in-between the data parser and then back to the programming<-run->debug cycle. Eventually, there might be a conclusion. Different train of thoughts will definitely leads to a different code. Some might be tempted to bail out; Some might look for other possible API to use, and etc. </-run->

Choice of 2. will impact 3. For an example, if array was used, and since array can only store 1 item in each allocated memory block. Logically it would lead to several outcome, such as OOP style i.e creating a class with 2 variables. creating 2 arrays, one for storing words and one for storing frequency. using more advanced data structures. The algorithm is pretty much straight forward. check whether is the first occurance. if not, increase the word-count, else insert the word and with word-count =1.

The efficiency of the code will be hampered by the type of data structure chosen. For an example, let say one array is used to store words, the code need to loop through the array to find a similar word. That is O(n) and the worst case scenario will be looping through the entire array. Since the words come in a random, and the array content not sorted, just to make the matter worst. Let say there is a match for the same word, the count need to be increased. Then it will be another loop through the word-count array, that is another O(n). Most likely this piece of code is implemented in an O(n^2) fashion. Is there a better way that can achieve O(1)?? [don't peek at my code yet, research about data structures, particularly the map]. Why I know to use a HMAP, it boils down to 2 things. I read about it, and I used it before. The worst thing you guys might be facing is "Ï heard it before (from some random conversation)", then it will be just another round of wild goose chase.

As for the sorting by frequency of words, again the choice of data structure made earlier affects the options available later. Hint* use Java.Collections


The first 3 SP students that respond with your OWN thoughts that were translated into code shall get a post card signed by me and snail mail from London, UK. POC + FCFS only.


code, enjoy!
just incase the embed fail... https://snipt.net/teos0009/alice-java-rip-file-out/?key=7b596e4ec720813b7b35e4eac8ee9992


Tuesday, August 16, 2011

[Java] Credit Card validity checker using Luhn and known MII

I received an email from Mr.Chua yesterday seeking help on behalf of "dignitykitchen" to address the matter on
1. whether there is a way to differentiate the various credit/debit cards eg. AMEX, VISA, DINNERS etc?
2. Is it possible to read the card to get the card number and tell the type of card?

Suddenly the thought of using this as a case study for Java programming I assignment crossed my mind. 

Nonetheless, I could not wait till next semester to start to code and quickly hack up a POC using Java for Mr.Chua. Usually, I code in C++ or python, since we are going to learn Java Programming I soon therefore I shall code more often in Java. The implementation can be ported on C, C++, Java, python, android, arduino (to hook up with a magnetic card reader, more later) etc. As long as the programming "logic" is sound, it can be demonstrated using different language. It is analogous to saying "I love you" in different language..... You get the idea.

The code uses luhn algorithm to check the validity of the credit card number, through a series of steps on choosing alternate number starting from the LSB, perform calculation and finally a MOD10 . The code does NOT check the validity of the card with the credit provider. Features such as manual input, identifying credit card provider were added. The code base can be expanded to recognize more info from the number itself. 

Apparently I misinterpreted the word "read" from the email received, after realizing it from another colleague's suggestion on using magnetic card reader with an MCU to "read" in the data from the card and do the validation checks on the MCU iteself. Anyway, the validation code can be ported to the said MCU... e.g Arduino with a magnetic card reader.

NOTE: Source code is for academic use only.
1. place Main.Java and LuhnCheck.java in the same folder. Compile (I did it using javac) and run.

Main.java

Luhn.java

there goes my lunch time...... duhz.....