Saturday, July 28, 2012

[IoT] DIY “Solar” air conditioning with Data monitoring over the Internet


[IoT] DIY “Solar” air conditioning with Data monitoring over the Internet

There are a couple of people that help in a way to make my stay in the office on a Saturday afternoon less miserable. This DIY “solar” air conditioning came about when my puny fan puffing helplessly in my office trying to make the ambience comfortable is less than sufficient. I am self proclaimed a not demanding person, but the hot and humid weather out there is making things worst in a room without a/c over the weekends. Thanks to Mr.Napon for salvaging the aquarium pump, BIG A$$ 12V 1A DC fan and much more and by chance I discover it while “kay poh” in the FYP lab; Mr.Monitr for the salvaging the V10, and Gemini CPU cooler, both made by CoolerMaster. My students Sam, Hon for the man-hours (*read* manual labour) and polystyrene ice box courtesy of Suanzhi.

What I am trying to attempt here is to convert the hot and humid air in my office, into cool dry air. I observe that my metal water bottle once filled with icy cold water, condensation will occur when I am walking back to the office from the water cooler (it is located out-doors). Therefore, having copper pipes to run icy water circulating through the aluminium heat sink while hot air is being drawn to the chilled metal surface, condensation will occur. The condensed water will then drip into the ice box filled with ice packs and water. For instant gratification of Cool Air, an DC fan is used as an exhaust. Simple right? But, it is only good for 2. There are still no scientific data captured to justify the duration needed to cool down my small office of 35m^2, nor thermo dynamic modelling of this sort of Air conditioning. What I am trying to achieve is, over some extended period of time the room temperature and ice box temperature will reach an equilibrium, effectively bringing down the temperature of the room. More info here http://en.wikipedia.org/wiki/Heat_equation

What makes it solar then??? Well, if the Solar panels are used to provide 12v to the dc fan and dc pump in this setup, isn’t that “solar air conditioning”.

Stuff that you might need
2x BIG DC fan 1x Aquarium pump (preferably DC pump it you happened to have one lying around) 1x CPU Heatsink 1x copper pipe 
1x polystyrene ice box
Nx reusable ice pack (I got mine from Daiso for $2 each, I got 20 of them. Yeay~) 
** solar panels (Optional) 
Procedure 
Chill the ice packs in the freezer compartment for over 12 hours. On polystyrene ice box, make 2 holes to accommodate hot air intake and cool air exhaust DC fans. On CPU heat sink attach the bent copper pipe, welding is out of my means, hence cable ties FTW~! Attach aquarium pump to copper pipe, the connector is modified from a furniture stopper. Turn On to Enjoy!


Ice packs in the polystyrene box. Show here 10 only.
LHS DC fan with heatsink is drawing hot & humid air into the cold chamber, RHS is cool air exhaust.


Poor man’s make shift air duct. I still can’t get my paws on proper A/C duct.


That’s the hot air intake side.


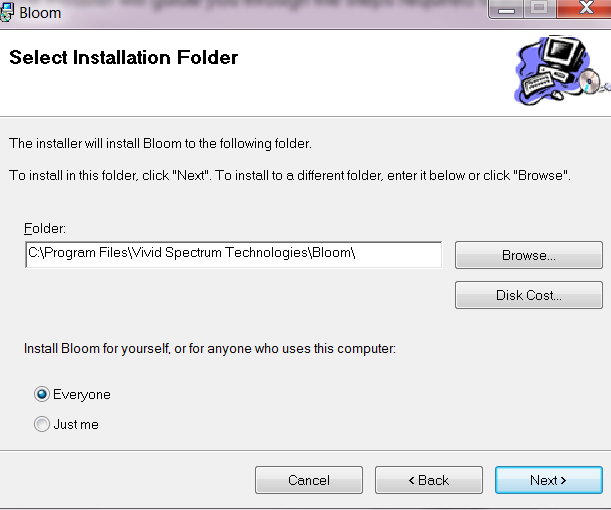
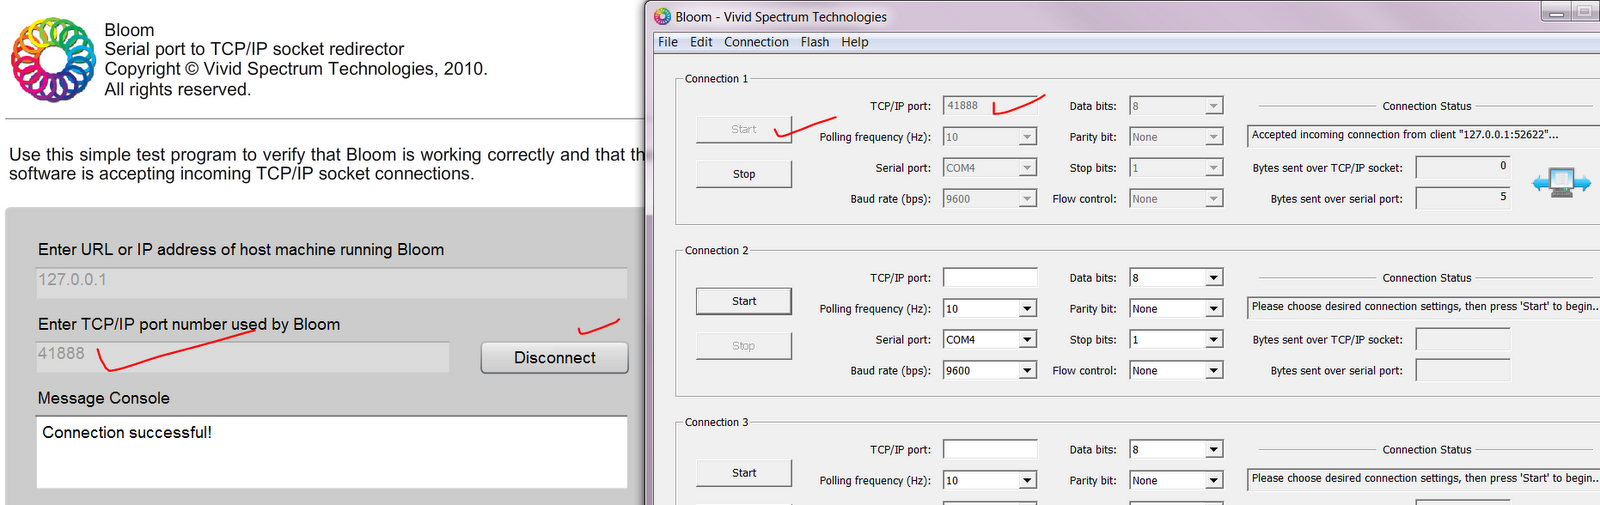
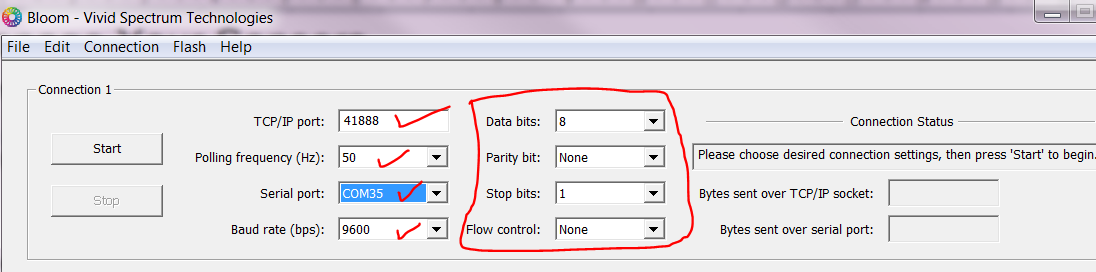
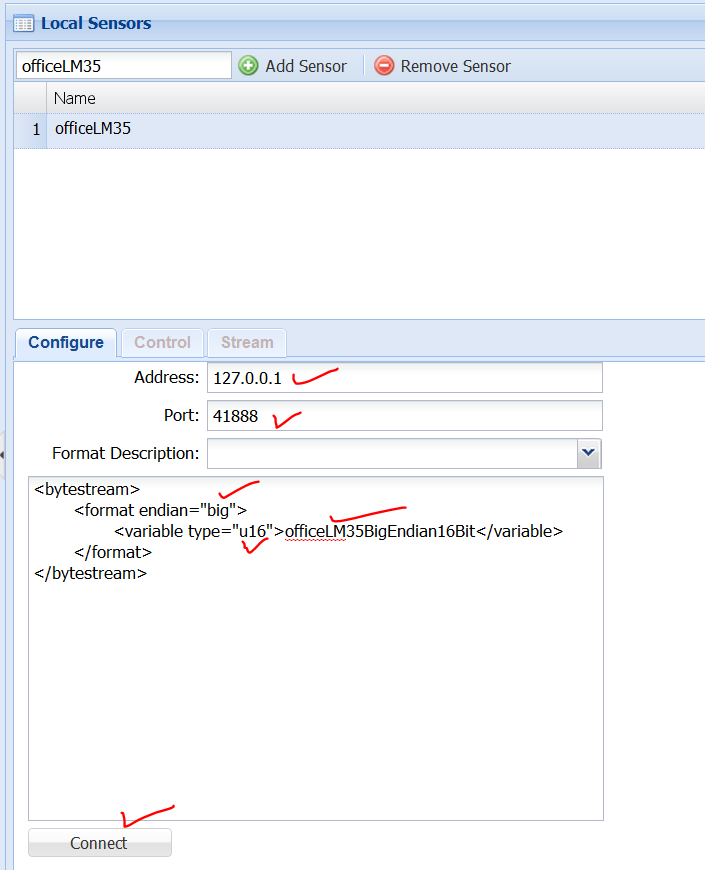
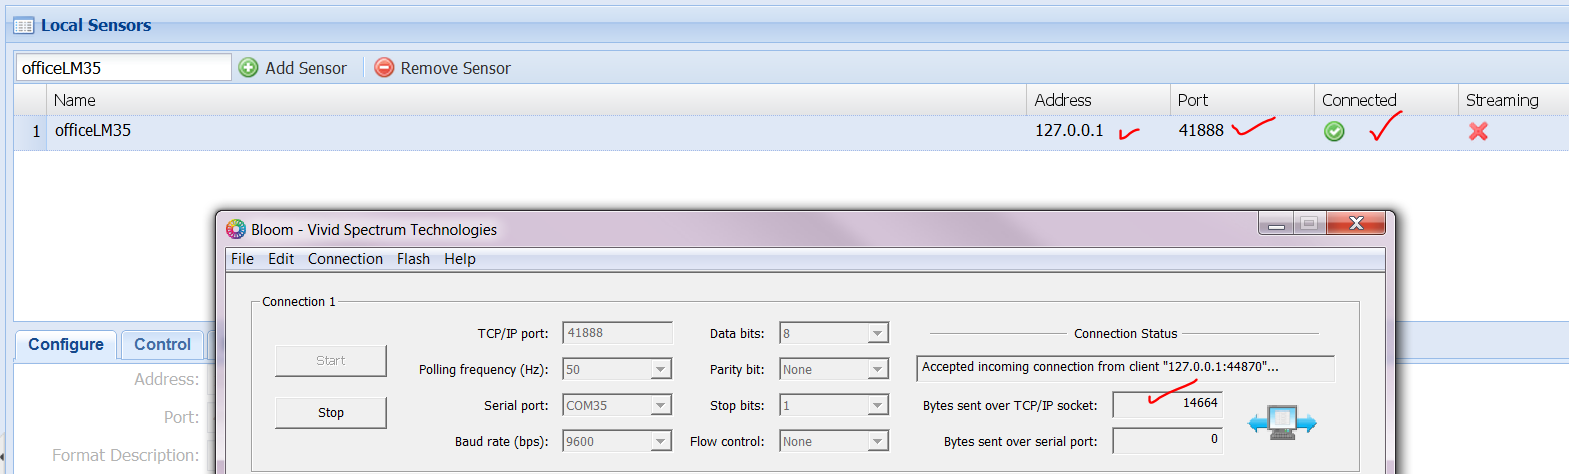
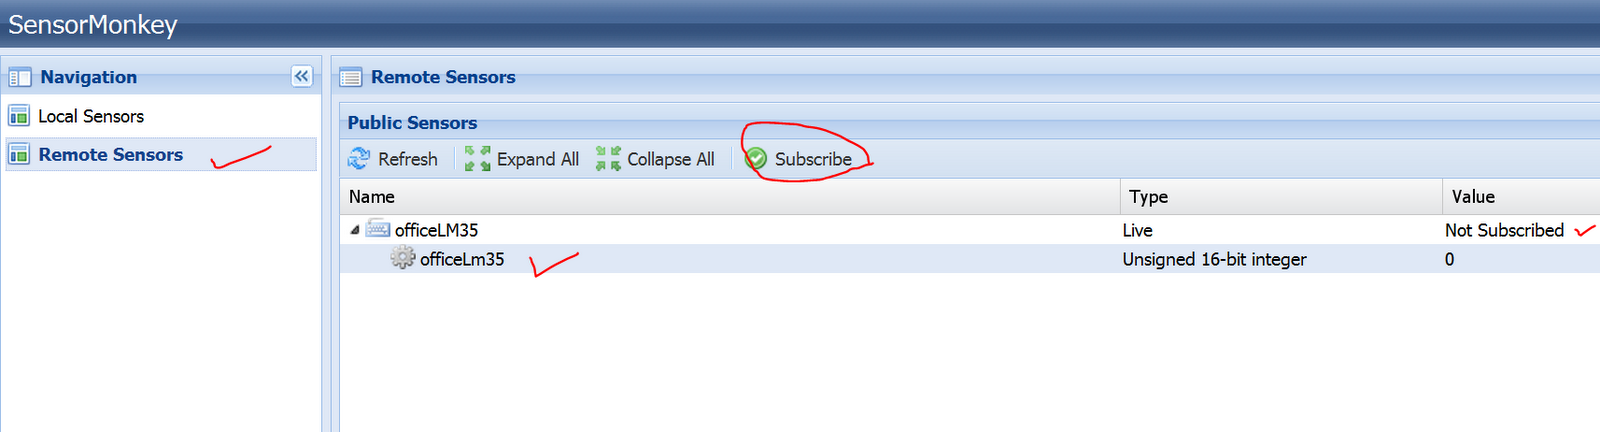
The LM35 is hooked up to an arduino and connected to internet for data monitoring over at my blog.
Without the air conditioning, it is 30 to 31degC in my office, according to the data acquired by LM35. While assembling this setup, I sweat through one tshirt..... it is dripping wet.............


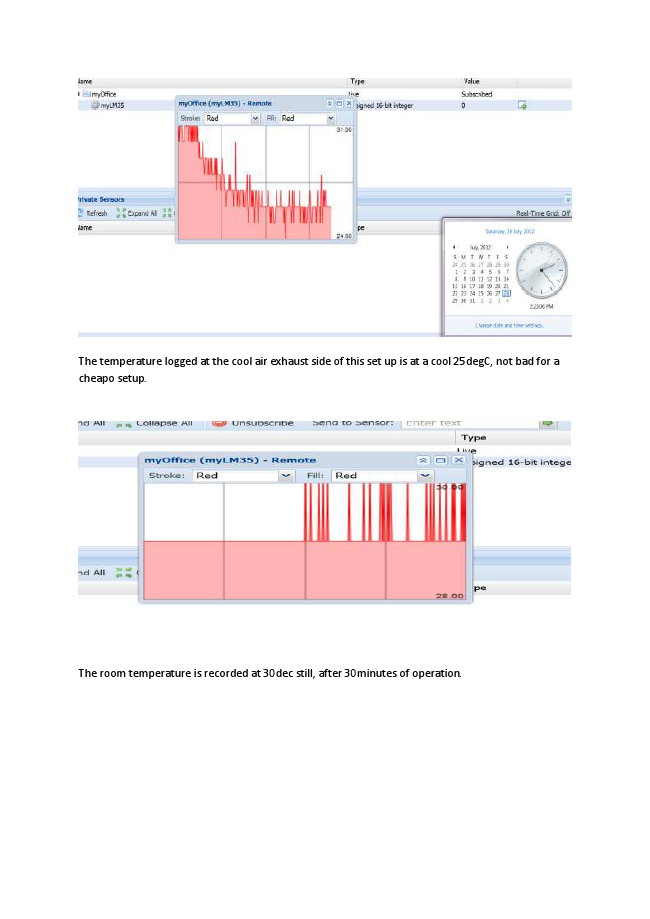
The temperature logged at the cool air exhaust side of this set up is at a cool 25degC, not bad for a cheapo setup.
The room temperature is recorded at 30dec still, after 30minutes of operation.


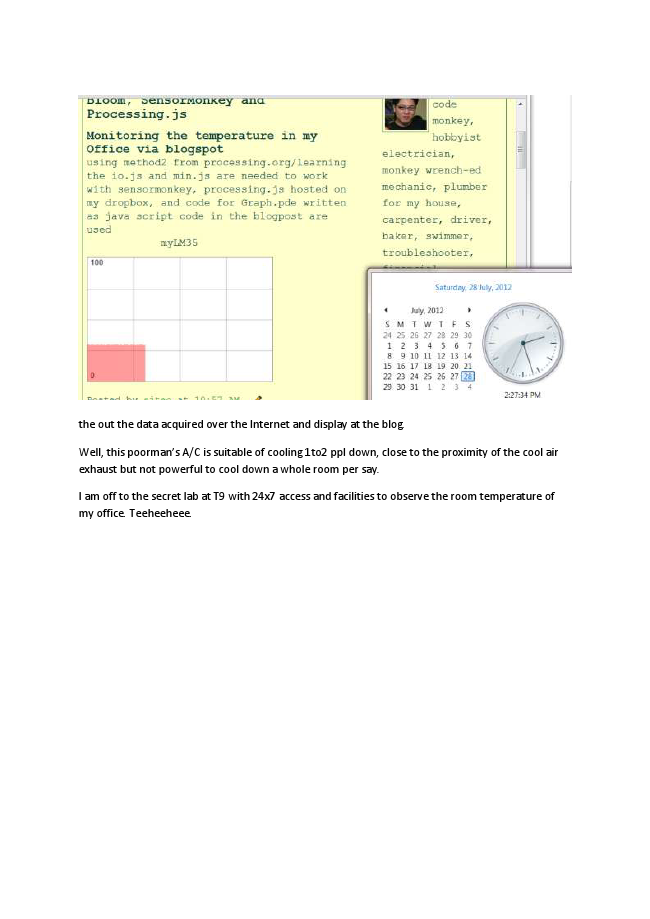
the out the data acquired over the Internet and display at the blog.
Well, this poorman’s A/C is suitable of cooling 1to2 ppl down, close to the proximity of the cool air exhaust but not powerful to cool down a whole room per say.
I am off to the secret lab at T9 with 24x7 access and facilities to observe the room temperature of my office. Teeheeheee. video for the cooling in action

Thursday, July 26, 2012

[IoT] How to stream temperature sensor data over the Internet


Fancy some IoT stuff???
I just made a temperature monitoring over the internet using a suite of Open Source software and hardware over the last few days. What triggered me was the youtube video on sensormonkey on hooking up a sensor and published the sensor data live over the Internet. The most intriguing part was, it comes with Public and Private key pair for use with public and private sensors. The video demo for the potentiometer was done using local, i.e 127.0.0.1 and later videos were on the owner’s Internet server. There is a possible gap that needs to be address, which is publishing sensor data over publicly available and FREE web publishing services. Particularly in this example of mine, publishing the temperature sensor data over my blog.

The reason for me to do so? Usually I am at a dilemma of coming to office to work over the weekends. The central air-cond that powered the whole block of T15 (7 floors, each floor with 6 tutorial rooms, each room with 3 aircond unit) will not be turned on for MY CONSUMPTION. Working in a stuffy, HOT & HUMID office can be counterproductive, with my small little pathetic fan puff helplessly to cool down. Nonetheless, work still need to be done.  Sometimes, there are events that are running here and I will get to enjoy the cool working environment and achieve UBER PRODUCTIVITY. But it is a hit and miss situation. Having this Open Source Temperature Monitoring of my Office over the Internet, I can make a well informed choice on where to work.

The flow of connection will be as below.
LM35->Arduino ->computer->bloom->sensormonkey->processing.js->blogspot

Stuffs that you might need to do this experiment

  1. Arduino www.arduino.cc , and a LM35 temperature sensor connected to A0. It is the hardware that acquire real world data and digitizing it for Internet consumption.
  2. Bloom http://sensormonkey.eeng.nuim.ie/index.php/site/page?view=support.bloom bridge the gap between serial data and TCP/IP data.
  3. Sensormonkey http://sensormonkey.eeng.nuim.ie (thanks for the awesome introduction and tutorial) provides the platform to publish data on the Internet
  4. Processing.js , sister of processing; provides the visualization of the sensor data
  5. Blogspot.com , web blog
At the background, several services are required. www.dropbox.com to host the processing.js file, and processing IDE to compile the code for *.pde

The whole procedure start by programming the LM35 on Arduino, Configuring bloom, setting up sensormonkey, programming the javascript and pde and finally host it on a blog. One point to note, to ensure data is continuously stream over the Internet, remain signed-in on sensormonkey, do not close the sensormonkey page, do not stop bloom, do not disconnect arduino from computer and finally, do not turn off the computer. PHEWWWW……

Sounds Complicated to IoT your sensor data on a blog??!!!? LOLx
It took me a few days, but I only get to work on it after office hours for maybe 1-2 hours each day. It ranges from figuring “how-it-works” to installation, troubleshooting and finally deployment. Be sure to check out the comments in the source code for the explanation.


  1. Connecting LM35 to Arduino
Connect the pins accordingly to A0, 5V and Gnd on the LM35.
Check out the code on snipt.net

  1. Download and Install Bloom, URL from above.
    Click next to continue

    After installation, this icon will appear on your desktop.


    Do a preliminary test with bloom, make sure your serial device is connected. Mine is a dummy serial on com4 with port 41888. The port number, use one that is ephemeral range, which is
     49152 to 65535, recommended by IANA. But, I like the number 41888 very much. LOL. Do not use the range <1024, it might conflict with existing application with networking capabilities.

Check out the configuration, taking special notice to parameters marked with a red tick.


3. Login to sensormonkey website with your Facebook account.

Click on sensors, follow by launch sensormonkey control panel and you will be greeted by the screen below.

Configure your ports (TCP/IP and serial) accordingly. My arduino resides at COM35, yours might be different. Use 9600-8-N-1, failing to match the parameters both side will result in data corruption. So, if you would like to use 115200 instead, remember to change accordingly in code for arduino and also bloom.Next, enter the name for the sensor. I find this naming too ambiguous. It should be the name of the board/device instead of sensor. I made a mistake of naming all of the variables officeLM35 and had a problem at a later stage programming the *.js and *.pde. After naming the sensor, the following screen appear


Configure the sensor. On arduino, the code is Big Endian, 16bit and MSB is always transmitted first. The variable name “officeLM35BigEndian16Bit” does matter, because it will be used in the *.js. The variable name was changed to something meaningful at the later part.

The final configuration for my office temprature sensor as seen here http://shin-ajaran.blogspot.sg/2012/07/drive-webpage-on-blogspot-in-real-time.html
Sensor name @ local sensor: myOffice
add sensor: officeLM35
sensor configured to use js graph: myLM35

Click on connect.

Click on the icon circle in red to observe the data. I took the liberty of modifying the colours, just for experimenting.
To publish the sensor on the Internet as a public, follow the following screen.


One the data is publish on the local sensor panel proceed to publish it for remote streaming

Click on the remote sensor and click subscribe

Once all the above are done, there are several things to take note of. Go to the sensormonkey website and locate your Public key, private key and namespace. These data will be used in conjunction of your  streaming data.

4. Testing of data streaming with local HTML5 file
Download processing.js and place in the same folder as the *.html file
Downlod processing and compile the file as Graph.pde and place in the same folder as the *.html file.
Check out the html5 code hosted on snipt. You are good to go.
HTML5 rox~!
in your html code, the path to the processing.js and Graph.pde is important, reflect accordingly. Another thing to add, this is indicated as method1 on the processing.org/learning


The weird part, the *.html opens in firefox, but not chrome nor IE.

If you notice that, the streaming data is always 100 (for degC). The problem lies with the variable naming in sensormonkey , *.js and *.html
When the page is closed, a pop-up box will appear.
After troubleshooting the code…. Inferring is very important in troubleshooting software / code related issues.
SWEEET~!

Check out the final source code for the method2 implementation
5. Testing with blogspot.
After much tinkering with *.pde + *.js + *.html on blogspot, I came to the conclusion that method2 indicated on processing.org/learning is the workable solution. Heng arh!


Enjoy

[IoT] Drive a webpage on blogspot in real-time using LM35, Arduino, Bloom, SensorMonkey and Processing.js

Drive a webpage on blogspot in real-time using LM35, Arduino, Bloom, SensorMonkey and Processing.js

Monitoring the temperature in my Office via blogspot

using method2 from processing.org/learning the io.js and min.js are needed to work with sensormonkey, processing.js hosted on my dropbox, and code for Graph.pde written as java script code in the blogpost are used
myLM35
<!--canvas is html5 feature client.subscribeToStream( "/public/myOffice", function( e ) { if( e ) { alert( "Failed to subscribe to stream: " + e ); return; } client.on( "publish", function( name, fields ) { if( name === "/public/myOffice" ) { theLM35Graph.update( fields[ "myLM35" ] );//myLM35 is var of sensor created on sensor monkey } } ); client.on( "bulkPublish", function( name, fields ) { if( name === "/public/myOffice" ) { for( var i = 0, len = fields[ "myLM35" ].length; i < len; i++ ) { theLM35Graph.update( fields[ "myLM35" ][ i ] ); } } } ); } ); } ); client.on( "disconnect", function() { alert( "Client has been disconnected!" ); } ); } ); } --> -->

Friday, July 20, 2012

First love with python


First love with python
A couple of things to do before we could start to write *.py code on a windows machine.

  1. Download python from http://www.python.org/getit/
  2. Install the msi file python-2.7.3.msi
  3. Download pyserial from http://pyserial.sourceforge.net/pyserial.html
  4. Install the exe file pyserial-2.5.win32.exe
  5. More about the pyserial (good stuff to use with ARDUINO) later
After downloading the necessary files to run python, now is code time~
  1. Create a notepad file, rename it to *.py.
  2. Type some simple code, e.g print ‘Hello World’
  3. Start CMD
  4. Set path for using python compiler
  5. enjoy

Sample method to exe py, set path, navigate to the *.py folder, exe.
The “hello world” equivalent .
Install of pySerial. This will be the communication bridge between the arduino and python script.
  1. On the Arduino, create a code that send “Hello world” to computer over serial
  2. On the computer, create a code that detects the intended message and exe some conditional code.

code here~~
Some might ask why python?
Still remember my last experiment using arduino with java over serial?
This is why…….

Thursday, July 19, 2012

Arduino talks to Java over Serial Interface


Arduino talks to Java over Serial Interface
  1. Install arduino as per normal
  2. Check that the *.dll exist in this path
    Drive:\folder\arduino-00VER\
    rxtxSerial.dll
    Check that the *.jar file exisit in this path
    Drive:\folder\arduino-0022\arduino-0022\lib\
    RXTXcomm.jar
  3. Create run.bat with the following data in this format, modify the parameters to suit your computer’s path.
    This will use javac to compile java and execute from CMD.

    @set path=%path%;C:\Program Files\Java\jdk1.6.0_25\bin
@D:\Users\s41764\Desktop\Documents\Downloads\arduino-0022\arduino-0022
setlocal
set PATH=%PATH%;D:\Users\s41764\Desktop\Documents\Downloads\arduino-0022\arduino-0022\
"C:\Program Files\Java\jdk1.6.0_25\bin\javac" -cp "D:\Users\s41764\Desktop\Documents\Downloads\arduino-0022\arduino-0022\lib\RXTXcomm.jar" SerialTest.java
"C:\Program Files\Java\jdk1.6.0_25\bin\java" -cp "D:\Users\s41764\Desktop\Documents\Downloads\arduino-0022\arduino-0022\lib\RXTXcomm.jar;." SerialTest

  1. Upon successful compilation by javac, the program will run and display the string send by arduino.
  2. To detect the specific character sequence and associated code handling in java, use api call String.compareTo(). Note that the serial receive is not fix number of bytes. Hence, a buffer is required to store the intended message from arduino, and then to do a string comparison.


Running the default code from
http://www.arduino.cc/playground/Interfacing/Java
Need to change port number in java code to reflect the arduino

check out the modified code here