Monday, December 22, 2014

noob's guide to ESP8266 with Arduino Mega 2560 or Uno

Few weeks back, the founder of the company that designed the chip ESP8266 was in town and he gave a presentation. Unfortunately, sharing the same time/space with the speaker is too much of a luxury for yours truly. Thanks to the Internet and social media, the info on ESP8266 was received. Very excited about this new discovery on the ESP8266, partly due to the fact of missing the boat for a similar product: Spark.IO. Before any order for ESP8266 was placed, some literature review (read: searching via google) was conducted and there were many sources on the Internet such as hackaday and the official manufacturer website of SEEEDstudio (more about the websites later) that warrant for such a cool device. It seems to be very easy to setup up. Making some IoT inspired devices with ESP8266 seems to be "easy" and "fast". A local reseller was sought to bring in 10x of ESP8266 at SGD9.5 each. Delivery was prompt. Within 3days of ordering. the order was delivered. The vendor briefly mentioned the ESP8266 purchased was manufactured by SEEEDstudio. Being a follower of the RTFM mantra; yours truly starts by following the "official" setup guide. That is when a series of frustrating after office hours start.

For any open source products to be successful or adoption en masse by the "makers"/ "DIY-ers" / "dev" / "etc"; an up-to-date and accurate documentation or quick start guide has to be provided. User's posts in discussion forums are good, but the bits and bites of (usable) information are hidden in the troves, hiding deep inside irrelevant comments/posts. This might discourage the faint-hearted from "looking harder" at the problem. After scouring the Internet to find some leads on why the setup via "official" guide has failed, the good reads discovered are placed in the references section. From a seeming "easy" writeup on the SEEEDstudio official guide, it took many hours trying to troubleshoot the setup to make it to work..

To save you from the frustrating moments, let's cut the chase and go straight to what works. If you are interested on what doesn't work, read between the lines or skip the steps below till the "what works /does not work" section.

There are a few parameters that will make or break this setup. Due to unforeseen err in documentations/writeups, the following parameters that worked were result of bruteforced effort.

The parameters relevant to this setup are
ESP8266 version
Choice of "matching" baudrate (e.g 9600, 57600, 115200) for 2 set of serial comms: ESP8266<->Arduino, and Arduino<->USB serial monitor (hardware serial or software serial)
Choice of 5v and 3.3v bridging circuitry between Arduino and ESP8266
Choice of Arduino Mega or Uno, that affect the availability of serial comms
Choice of terminal software
Choice of code for testing

Yours truly recommends Arduino Mega with ESP8266, using either logic level shifter or voltage divider, and Serial Monitor.

Assuming you only have an ESP8266 and an Arduino, trying to make ends meet without another FTDI breakout board for the softserial, you are not out of luck. Check out the footer for the source code that uses RGB LED as indicator instead of softserial.

It is not fun to brute-force or conduct A/B tests to solve the equation of 6 unknowns to get a "hello-world" type of setup. Especially when the official manufacturer's guide has been written such a way to heighten expectations from the ground. Hello world tests on newly acquired hardware or software are meant to be quick to read/learn, easy to wire/setup, and straightforward for customized applications.

Hardware needed
0. ESP8266 aka ESP-01. This one is manufactured by SEEEDstudio. It runs off 3.3v only; can be powered off arduino's 3.3v pin or a separate supply with 3.3v and 500mA. Do not plug a 5V source to it.


1. break out board for ESP8266. This is made of a 4x4 veroboard, PCB headers, and jumper header. Be sure to score a line to separate the copper strips from shorting the adjacent pins.


2. Serial comm options on Arduino(s)

ESP8266 and Arduino needs 2 serial comms; either 1 hardware 1 software or 2 hardware serial.

Arduino Mega is preferred because of the 4x hardware serial. The nett effect is serial0 can be used for monitoring on PC USB, serial1 or2 or 3 can be used for comms between arduino and ESP8266 to issue the AT commands

or

Arduino Uno and a separate FTDI serial to USB breakout board. In the references section, some writeups suggested the limited baudrate on softserial affects the readout of ESP8266 on serial monitor. (more about this later)

3. logic level shifter
Arduino speaks 5v and ESP8266 speaks 3.3v.

option A: plug directly the TX-RX pairs between arduino and ESP8266. If used, there is a risk of damaging both of them. You might get lucky for getting away with this? How many times you can get lucky?

option B: use a voltage divider circuit to divide 5v source from Arduino to 3.3v source for ESP8266. Acceptable methods, definitely much better that plugging in directly.

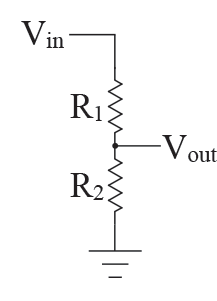
URL for voltage divider calculation: https://www.abelectronics.co.uk/tools/resistor-voltage-divider.aspx ; Vin is 5v, Vout is 3.3v, enter either R1 or R2 with a resistor value available at your disposal.

The following diagram decribes the setup with a 330ohm and 180 ohm resistor voltage divider circuit


option C: logic level shifter, e.g those sold by sparkfun. This method is highly recommended


4. wiring scheme


Rule of thumb: always check pin out diagram before wiring, ensure common ground, vcc and gnd are connected according to voltage specs. ESP8266 CH_PD aka chip power down and RESET are connected to 3.3V for logic high; TX & RX pair for comms: ESP TX-> Arduino RX; ESP RX-> Arduino TXAssuming using Arduino Mega Serial2 (pin #16 and #17), ESP8266, and logic level shifter by sparksfun.

logical wiring schematic

MEGA ------sparkfun logic shifter -------ESP 8266
5V                HV
3.3V             LV
3.3V                                  VCC, CH_PD,RESET
GND            GND (both HV and LV)      GND
TX(#16)      HV chn0 RX---LV chn0 RX   RX  
RX (#17)     HV chn0 TX---LV chn0 TX   TX

the following diagram describes the wiring setup on a breadboard.


Software needed
Note: baudrate must match on both ends of a pair of comms device.
There are 2 serial comms as mentioned earlier.

0.0. baudrate for Serial comms between Arduino and ESP8266
Some sources on the Internet (e.g the official manufacturer's guide) recommended 57600, some forum posts recommended 115200. However the ESP8266 received (on dec14) was the latest version (0902) and the baudrate was set at 9600. Assuming all of the other parameters held correct, changing of this baudrate is not much of an issue. The following screenshot describes the ESP8266 software version in detail following a "correct" setup on both hardware and software. The main challenge is troubleshooting uncertainty on the hardware setup and software parameters. 


0.1 baudrate for serial comms between Arduino and USB monitor
Assuming using hardware serial, any baudrate will do.
Software serial has a limited baudrate of 19200.

0. terminal software
Hyperterminal, Arduino Serial Monitor, CoolTerm, SSCOM

Assuming using the hardware & wiring identified earlier, Arduino Serial Monitor can be used to monitor the serial output. The USB port on Arduino is by default Serial0.

1. what to expect

Powering up the arduino and ESP8266 setup. 
The ESP8266 red led will light up, and flashes of blue LED during startup.
use a wifi capable device, look for ssid ESP_XYZABC; where XYZABC is the last 6 digit of the mac address of the ESP8266. By default ESP8266 start up in soft AP mode with DHCP, and any wifi capable device can be associated to this soft AP and receive IP address of 192.168.4.XYZ

Congratulations, ESP8266 is alive (if survived any of the misfortunes happened earlier). 


2. source code for testing ESP8266 with Arduino

The source code listed above merely copied data between 2 serial interfaces. Hence Serial Monitor can be used to enter AT commands via USB monitor on Serial0 to ESP8266 on Serial2.

make sure the parameters highligted in red in the screenshot are set.

from the serial monitor window, enter AT and then press "send"; assuming all parameters are set accordingly, an "OK" will be replied by ESP8266.

to reset the ESP8266, enter AT+RST and then press "send".
some random data will then appear, follow by "ready"

congratulations, ESP8266 is responding to some AT commands.

3. Source code for testing ESP9266 on an Arduino with Internet

An wireless router/AP is setup with the SSID "Edge", Security is set as "WEP", and DHCP. The WAN port of this AP is connected to the Internet. In the following diagram ESP8266 is connected to the AP, and issued with a private IP. However, the WAN port on the AP does not have an IP assigned, hence there is no Internet access. 


The modified source code for testing is available on gist 


Congratulations for coming thus far!! After all the hassle, Now, let's make some IoT inspired devices with ESP8266!!

Check out the URLs and PDF in the references section on what are the cool AT commands and configs for ESP8266

========================================================

Official manufacturer's documentation which doesn't work out of the box for yours truly
a few dependencies
1. the baudrate in the blog post is 57600 whereas the ESP82665 on hand is 9600, with no mentioned or whatsoever w.r.t it in the blogpost of the manufacturer.
2. the CH_PD & RESET are not held at logic high in the blogpost of the manufacturer.
3. open serial monitor and press reset on the arduino does not return any data at serial monitor. The main cause of frustration here is to figure out the no data displayed is caused by hardware e.g tx-rx pairs wiring, 3.3v and 5v circuitry wiring, etc or caused by software e.g baudrate on esp8266/usb or wrong code uploaded. The matter of fact, the statement itself is misleading. Assuming each and every parameter is config properly, there will be no data after performing the ritual of "open serial monitor and press the reset button on arduino" the magic lies at typing the command "AT" and then press "send" then the data will appear at output.

Methodology & Observations: Setup(s) that does not work/ does work

MCU: uno
comm: serial0 only
code: "Examples->basic->BareMinimum"
en: 3.3v to ch_pd and REST
cct: voltage divider
baud s0: 9600
D0 rx-> tx ESP8266
D1 tx-> RX ESP8266
Serial mon on Serial0; AT and then "send" => no response
//-----------------------
MCU: uno
comm: serial0 only
code: "Examples->basic->BareMinimum"
en: 3.3v to ch_pd and REST
cct: voltage divider
baud s0: 9600
D0 rx-> tx ESP8266
D1 tx-> RX ESP8266
SSCom32 on Serial0; AT and then "send" => no response
//-----------------------
MCU: uno
comm: serial0 only
code: "serial0 setup with 9600"
en: 3.3v to ch_pd and REST
cct: voltage divider
baud s0: 9600
D0 rx-> tx ESP8266
D1 tx-> RX ESP8266
SSCom32 on Serial0; AT and then "send" => no response
//-----------------------

MCU: uno
comm: serial0 only
code: "serial0 setup with 9600"
en: 3.3v to ch_pd and REST
cct: voltage divider
baud s0: 9600
D0 rx-> tx ESP8266
D1 tx-> RX ESP8266
Serial mon on Serial0; AT and then "send" => no response
//-----------------------

MCU: uno
comm: serial0 only
code: "modified hello word with RGB indicator"
en: 3.3v to ch_pd and REST
cct: voltage divider
baud s0: 9600
D0 rx-> tx ESP8266
D1 tx-> RX ESP8266
Serial mon on Serial0 can't used

//-----------------------
MCU: mega
comm: serial0 only
code: "Examples->basic->BareMinimum"
en: 3.3v to ch_pd and REST
cct: voltage divider
baud s0: 9600
D0 rx-> tx ESP8266
D1 tx-> RX ESP8266
Serial mon on Serial0; AT and then "send" => no response
//--------------------------
MCU: mega
comm: serial0 & serial2 for ESP8266
code: "copy s0<->s2"
en: 3.3v to ch_pd and REST
cct: voltage divider
baud s0: 115200
baud s2: 9600
D0 rx-> tx ESP8266
D1 tx-> RX ESP8266
Serial mon on Serial0; AT and then "send" => OK; AT+RST and then "send" => ready;

========================================================= 

ESP8266 on Arduino Uno with voltage divider circuit using serial0 and RGB led as indicator. Note the broken pin header on the arduino in the diagram.


References

Tuesday, December 9, 2014

Arduino and WiFly issues solved


Arduino IDE v1.0.5
Libraries: WiFlyHQ, SoftSerial
Hardware: WiFly RN-XV with compatible shield from sparksfun

Detail writeup to follow soon.


Tuesday, November 11, 2014

ATtiny85 spectrum analyzer for music to RGB LED with modified FFT


ATtiny85 spectrum analyzer for music to RGB LED with FFT

Excited with the new discovery of FHT library. Yours truly definitely want to give it a try on an ATtiny85. After hours massaging the code to make it to work, sadly, none come to functionality (yet). According to this site http://forum.dev.arduino.cc/index.php?topic=261759.0, ATtiny has as small footprint ""ATtiny85 on-board, 8K of flash, 512 byte of SRAM, 512 bytes of EEPROM"" hence can't work with FHT. However, yours truly beg to differ. He noticed that some code in the FHT.cpp can't compile due to reduced instruction sets on ATtiny85. More about that after some workaround can be found.


Nonetheless, yours truly really want to have some fun with sound to light on Arduino's poor cousin, the ATtiny85. Life is so boring without some LEDs' goodness. Just come to recall that, years ago yours truly have done a DIY spectrum analyzer using a modified FFT that use 8bits only, runs off an arduino and LOL shield http://shin-ajaran.blogspot.sg/2011/07/diy-arduino-vu-spectrum-analyzer.html. This modified 8 bit FFT came for a forum discussion http://forum.arduino.cc/index.php?topic=38153.0 . Reusing the same library but   has to be modified to for Arduino IDE v1.06 and later; reusing the electret amplifier mentioned in an earlier post http://shin-ajaran.blogspot.sg/2014/11/arduino-spectrum-analyzer-for-music-to.html; reusing the MitG PCB which is a breakout board for ATtiny85 made earlier http://shin-ajaran.blogspot.sg/2014/01/setting-up-hardware-for-using-arduino.html to make the contraption in the following diagram. 


code here:
youtube video here, the light changes according to the tone of the phone.

edit: after some code massaging, the colours appear somewhat according to what yours truly have in mind.


first try: Sadly, the colour changes are too subtle to be captured by a cheapo phone camera

Sunday, November 9, 2014

Arduino spectrum analyzer for music to colourful lighting using FHT and RGB LED

Arduino spectrum analyzer for music to colourful lighting using FHT and RGB LED

years back yours truly have made a contraption to convey the concept of fourier transform http://shin-ajaran.blogspot.sg/2011/07/diy-arduino-vu-spectrum-analyzer.html using Arduino, LOL shield and the FFT library. The piece of code is still hanging on the Internet, but the hardware has been re-purposed for the better of humanity.

Not long ago, yours truly come across the FHT (Fast Hartley Transform) by Open Music Lab http://wiki.openmusiclabs.com/wiki/ArduinoFHT while browsing the Internet for inspirations to continue with the current working life. This algorithm claims to be more efficient in terms of CPU cycles and memory footprint; well, true to speak because the premise is: FHT works on the "real" portion of the data whereas FFT works on both the "real" and "complex" portion of the data. Really excited by this discovery of the code library, yours truly can't wait to get his hand dirty on making a contraption that uses the above FHT. Following the instructions in the FHT wiki for installing the library and sample data output using processing is a breeze. This wiki also comes complete with a 128 channel spectrum visualizer written using processing; Scroll down until you hit "FHT_128_channel_analyser.zip" http://wiki.openmusiclabs.com/wiki/ArduinoFHT?action=AttachFile&do=view&target=FHT_128_channel_analyser.zip . A visualizer is very handy when it comes to deciding the "strategy" for the music to light algorithm.

Check out the video below for a demo of this make


This make assumes the following parts come in handy
1. 1x Arduino
2. 1x RGB LED (common anode)
3. 1x 3D printed LED diffuser
4. 1x electret microphone & LM386 audio amplifier.


Prelude: making the amplifier for electret microphone.
An electret microphone http://en.wikipedia.org/wiki/Electret_microphone is a cheapo microphone that reads in analog signal generated by sound frequency. This analog signal has to be amplified, and then passed into a microprocessor based system (e.g Arduino) for ADC (Analog to Digital Conversion). Once data is digitized, humans can manipulate the signal with code, hence the terminology : digital signal processing.

This make assumes an LM386 as the audio amplifier http://www.ti.com/lit/ds/symlink/lm386.pdf for the electret microphone is available.
There are many manufacturers of LM386, one of the is TI. Refer to the link above for spec sheet and then scroll down to the diagram "amplifier with minimum parts". If you need help on making a LM386 based audio amplifier, this instructable http://www.instructables.com/id/Know-Your-IC-LM386/ is helpful on getting started.

Prelude2: For those that are still clueless what is happening, check out this very thoroughly written article on sound analysis https://bochovj.wordpress.com/2013/06/23/sound-analysis-in-arduino/.

Step1: The wiring
Connect output from electret & LM386 audio amplifier to A0 of arduino, and VCC and GND to arduino's VCC and GND. Connect common anode RGB LED to pin 3,4,5,6 of Arduino;with pin4 dedicated as the common anode, pin3,5,6 dedicated as PWM pin. It is good to add some 220ohm resistors across the pin3,5,6 for current limiting. Yours truly has none available, hence the omission in the picture below. These 4pins can be used as the input to a transistor switched 12V load to control LED light strips. The following picture describes the wiring, and LED diffuser with Fibre Optic cable


Step2: the code and the strategy of choosing which frequency is for what colour

There are several ways to map the frequency spectrum to the RGB colour spectrum. Using AnalogWrite() on R, G,B; each PWM pin is capable of a value from 0-255 to drive the individual LED in the RGB LED. Thus, the total combination of colours possible (in code) are 256*256*256 = 16777216; thats a whopping 16M worth of variations.

For the visually inclined, the RGB chart below is a good guide for giving an idea what is the final colour blend at the RGB LED output corresponding to the R, G, B value written by AnalogWrite().


Processing has a useful article on colour https://processing.org/tutorials/color/ which yours truly think it helps with visualizing colour using code.

The questions come begging: How to map audio frequency to the colour spectrum??
Years ago, yours truly did an attempt at mapping colour to frequency using the self made LOLs shield http://shin-ajaran.blogspot.sg/2012/03/arduino-music-to-rgb-with-lolss.html, but it is not visually appealing.

Drawing inspiration from yours truly secondary school physics: human voice ranges from 85Hz to 255Hz; male voice is at lower frequency bands 85Hz-180Hz whereas female voice is at higher frequency bands 165Hz to 255Hz. As for human hearing, it is from 20Hz to 20K Hz. Futhermore, each musical instruments has it's own frequency range, and as we know, music composes of a variety of frequency stemming for human voice and/or musical instruments. Hence, the choice of strategy will be reflected in the colour observed while a piece of music is played.

Strategy: mapping audio frequency to colour spectrum
1. Mapping of human hearing e.g 20Hz to 20K Hz to 16777216 of possible RGB colours
1a. Mapping of whole audio frequency bands to 6777216 of possible RGB colours.
2. Choosing 3 channels deliberately; one each from the low, mid, and high frequency bands as observed using the spectrum visualizer mentioned earlier. The 3 channels of low, mid, and high corresponds to Blue, Green, and Red; with the intensity of the colour corresponds to the amplitude of that chosen channel. The output of RGB LED will then be "blended".
3. Similar to 2, but instead of choosing the channels deliberately, this algo is to group frequency bands into larger low, mid, and high frequency bands; within each of this group of larger frequency bands , the amplitude that is used to turn on the corresponding LED is the result of averaging all the amplitude from the frequency bands.
4. Similar to 2,3, but first apply a Low Pass Filter at the frequency bands.
5. LED activated by predefined threshold on frequency band
6. .....
...
N. ......
It seems to yours truly, finding an ideal mapping of music genre to colour is going to be an never ending story.
Cut the chase, let's go to the code.


Observations
No matter what are the music played during experimentation, it seems that the genre of the music maps to the corresponding biased group of frequency bands. Assuming the frequency bands are colour mapped eg blue for low, green for mid, red for high, definitely techno is going to appear more blue than red, and the counterexample eg opera is going to appear more red than blue. So the big Q: Which recipe for mapping of frequency to colour is "the best"? For this, yours truly don't have an answer, yet. It seems appreciating changing colour visually may differ from human to human.

Nonetheless, FHT is a really responsive algorithm implemented on Arduino. Check out the demo video below reacting to human voice.

Interested to pick up where I left? ping me!~~~~


Friday, October 31, 2014

IoT inspired: multi plug modified with SSR for AC control with a microcontroller

Yours truly is no stranger to controlling AC (Alternate Current, not Air Condition) with the use of microcontroller based system. In the previous posts, there were several iterations of arduino sous vide; controlling a SSR (Solid State Relay) or mech Relay to on/off AC connected to the heating element via a digital output from the microcontroller.

Fancy using an smart phone app to control the AC electrical appliances e.g lighting over the Internet? No matter what are your motivation to  control AC with a microcontroller based system, then the setup below to control on AC appliance may satisfy.

The AC controlling circuit from the previous iterations are not elegant. The leads from AC are exposed, one way or the other. A wire exposed for termination posed a risk to the untrained. The following picture describes the exposed AC leads connecting to a microcontroller based system, even with the use of a terminal block.


The hazards are real: assuming a user touches the exposed end (circle in red in the picture above), or the wiring connection is loose, or worst,a stupid attempt at a cheap stunt.

Ever since the first inception of the microcontroller based AC control circuit, the search is on for the "perfect", fully enclosed, risk free implementation. On a casual saturday strolling along the street, yours truly chance upon a small tuck shop and a transparent multi plug with enough space to hold the SSR PCB https://www.sparkfun.com/products/10684 . The rest is history.

This implementation requires a multi plug, and a SSR PCB.

Warning: Potential hazard to human. Do not attempt this hack while multiplug is on a live connection. Do not attempt to touch the exposed ends when live. Ensure human is properly insulated from ground with rubber sole shoes.

1. Dismantle the multiplug, and make space for the SSR PCB


2. some electrical tape is used to insulate the exposed end from coming into contact with the SSR PCB


3. Drill a hole (circle in red) on the multi plug to accommodate 3 wires (VCC, GND, SIG) to the SSR PCB. Remove some of the brass contact (square in red) on the live wire connection. The remove ends will be soldered with wires to be connected to the SSR PCB. Use electrical tape as necessary to insulate the exposed ends.


4. Solder electrical wire to the exposed ends of the live connection, circled red in the picture below


5. Secure 3 signal wires (GND, VCC, SIG) to the SSR PCB through the hole made earlier.


side view of the multi plug


6. Examine, label, test. In the following picture, circled in red is where the live connection is broken, and then the exposed ends soldered with electrical wires. These wires are then secured on the LOAD side of the SSR PCB. Test this modification of the multi plug only on a live system that is equipped with a functional ELCB http://en.wikipedia.org/wiki/Earth_leakage_circuit_breaker


user view of the modified multi plug with SSR


6. Observations
This is not the most elegant solution yet. The electrical wires (multicore) suffer from wire fatigue; due to the constant wiggling, twisting, and securing to the connector in a very compact space within the multi plug. Nonetheless, there are no AC exposed ends that might posed a risk to the end user. Plug the VCC, GND, SIG wires to a microcontroller, load some IoT inspired code and now you are ready to control AC electrical appliance over the Internet.

IoT SSR multiplug in action; using D7 on arduino to on and off SSR at 1second interval


Thursday, September 4, 2014

cheapest U$5.97 DIY sous vide setup

Yours truly is no stranger to DIY sous vide setup, having dabble in various microncontroller based home made sous vide setup. The PID controlled arduino sous vide setup by yours truly can be found here http://shin-ajaran.blogspot.sg/2012/12/coming-to-end-of-2012.html. This PID controlled arduino sous vide has been instrumental in setting up for the perfect dinner dates with the missus. I have cooked fabulous steaks, short ribs, lamb racks, and the epitome of my DIY sous vide home cooking: the effortless Beef Rendang. Details of the beef rendang can be found here http://shin-ajaran.blogspot.sg/2013/08/beef-rendang-sous-vide-70degc-24-hours.html

After rubbing shoulders with humans at several maker faire, or maker inspired activities across the continents spanning many miles apart https://www.flickr.com/photos/uclengineering/11119871993/
humans often remarked: "it looks so complicated/dangerous/scary!", "I want to have one but I can't write the program/wire the electrical/solder the electronics", " i want to buy a commercial one/the parts/components, but it is out of my reach", etc.

After seeing a fellow foodie and sous vide enthusiast trying to justify to own a sous vide setup; considerations include the cost, the complexity of setting up, the safety. Perhaps there might be something I can help to bridge this money/time/technological gap. Note: sous vide campaigns on kickstarter is tempting, but the waiting time for delivery is causing him anxiety.

After some searching online for cheap alternatives, I came across this temperature controller from aliexpress that cost U$5.97 with free shipping (to Singapore, that is). It sports an 8bit 32pin MCU the STM8S103K http://www.st.com/web/catalog/mmc/FM141/SC1244/SS1010/LN754

On the aliexpress product page, nothing was written about the control theory used to ensure the settling time, the rise time w.r.t to the target temperature. This module also sports a relay that is capable of 10A to be used to control a heating apparatus. The other nice thing is, it fits in a regular name card holder. Nonetheless, the entry price is low enough to tempt me to click "BUY". There is a caveat, the manual that comes in the package is in chinese.

parts needed
1. U$5.97 temperature controller module from "middle kingdom"
2. a modified single face plate AC socket & plug (UK standard socket and plug)
3. a heating vessel

instruments needed
1. digital thermometer
2. Fluke wireless thermometer is optional

step1
prep the U$5.97 temperature controller. The exposed AC end that is very close to the LHS push button has to be insulated. I have used some hot glue, and also a casing to isolate from human touching the PCB connectors accidentally. Thus module comes with screw terminals as connector for the DC supply and AC load. Solder a DC connector to the supply side. For the AC load side, I have used 2 wires, one end is cript with a fork cable lug, the other end is tinned, and to be connected to a screw down terminal block.

step2
modified AC socket & plug (UK standard socket and plug). This step can be potentially hazardous if safety procedures are not observed. Do NOT work on an electrical AC socket while it is plug into a live source. Make sure the exposed leads are properly insulated. Wear proper foot wear that comes with rubber sole. Check the working environment has an ELCB tested to be functional. Do NOT use thin wires for AC load. Use the wire from a standard 3 core power cable.

Wire a standard single face plate AC socket & plug as if it is going to be used as an extension. Now, instead of the live wire (brown colour, UK standard) going directly to the socket pin where it is supposed to be; make an "open circuit" on the live wire and connect the exposed ends to the screw down terminal block. This terminal block will act as a "switch" to be controlled by the relay on the temperature controller module.

Please note this might not be the best way of doing it with the wires exposed. If you have a better way of connecting a relay to an AC live wire, give me a shoutout.

step 3
prep a heating vessel. I have used a cheapo 1.3L mini heater jug cum cooker as my heating vessel. It comes with an adjustable knob for the heat setting and is rated as 1100w (max) on the box.

step4
connect all the components together. before turning it on, perform a final check for correct wiring, proper insulation, AC safety standard, etc.

step5
perform intial heating/temperature test. make sure the temperature register by the sensor of the temperature controller module is approximately to the digital thermometer.

step6
test cook an 64degC 45min egg.

Friday, August 29, 2014

ET1010 MAPP design contest entries

Wearable Assistive Tech Gripper


automatic braille


DICE creamaker

Friday, July 25, 2014

techno mohawk, maker faire, arduino, ATtiny85, WS2812 RGB LED


yours truly has devised this Q&D contraption for singapore mini maker faire #SMMF2014

Check this previous post on how to use Arduino, ATtiny85, WS2812/2811 RGB LED strip http://shin-ajaran.blogspot.sg/2014/04/wearable-electronics-arduino-x-attiny85.html

The contraption below use almost similar components, except the fiber optic 5mm strands as mohawk.

Wiring of this contraption is as per the following diagram.


The following diagram describe the crafting of this contraption.


video here


code here

Friday, July 4, 2014

3D printing with wood filament

3D printing with wood filament
This week the wood filament by laywood is explored for 3D printing using makerbot replicator2. 3D printing in wood offers a new range of application.  Experimentation with this new medium to explore the possibilities of what can it used for. The beauty of this wood filament, it can be post treated as per the usual wood working, sanding included.
Loading of the wood filament into makerbot replicator2 for 3D printing is a breeze. Check out the previous post of modifying the loading mechanism http://shin-ajaran.blogspot.sg/2014/04/3d-printing-using-ninjaflex-with.html
Standard PLA setting from makerware is used, but the temperature is set to 180degC instead of the usual 210degC to explore the texture and colour of the 3D printed parts. “Oozing” is observed from the 3D printed parts. Oozing in this context refers to the web of fine threads hanging from wall to wall of the model akin to a spider web. It has a term for it: “oozing while printing”.
Further refinement of the speed of filament extrusion/retraction, speed while extruding, and speed while travelling need to be tweaked to achieved a “cleaner” 3D printed parts.
A challenging model to print without support, due to the overhangs that are spiralling up.

This is the final output is plague with “oozing while printing”. Mentioned earlier, tweaking of the movement speeds of the 3 parameters are still waiting to be tweaked to perfection.

This website http://reprage.com/post/37966750340/how-do-i-stop-plastic-from-oozing-when-3d-printing/ offers some suggestions such as lowering the temperature of the hot end, reducing the movement speed, and increasing the retraction length. All the above requires time to discover the best settings!

Engrave photo on wood with a laser cutter

Engrave photo on wood with a laser cutter
A photo or image can be realized on a piece of wood with the use of laser cutter. The process is simple. First, the photo has to be digitally manipulated. This photo is then sent to “print” via the laser cutter using popular vector drawing software such as coreldraw.
To digitally manipulate the subjects composed in a colour photo, popular vector drawing software such as coreldraw (proprietary), inkscape (open source) can be used for manipulating it into greyscale, and then subjects are outlined in black. The varying shades of grey, and black outlines determines how much power the laser cutter should output to engrave the piece of wood via the “rastering” mode. The darker the region, the more power will be output to “engrave” the wood by burning parts of it.
In FabLab@SP, 3 laser cutters are available; The Epilog, The Rayjet, and the HAS. The general steps to engrave photo are similar, but the parameters to set for laser cutting associated to different type of laser cutters are slightly different.
Parts needed
  1. A piece of wood; balsa, plywood will do. Preferably 3mm or 5mm.
  2. Access to a laser cutter. This guide assumes access to the epilog laser cutter
  3. Access to a vector drawing software, or photo manipulating software such as adobe photoshop, coreldraw, inkscape, etc. In this guide, an online photo editor www.ribbet.com is used.
  4. A photo of choice.
Step1: upload photo to be edited to www.ribbet.com
Step2: Click on “effects”, then scroll to “Extra Black&White”. Manipulate the 2 sliders “Brightness” & “Contrast” to achieve the desired outcome as per depicted in the following diagram. Desired outcome to be achieved can be defined by “high contras on specific features, such as facial features of the subject(s)”, “white-out background to give a strong highlight on the subject”
D:\Users\s41764\Desktop\laser cut stuff\ribbet1.PNG
Step3: Still in “effects” tab, scroll to “pencil sketch”. This effect will highlight outline the subjects as per the black & white photo, by giving a darker shade of grey at the edges. Manipulate the sliders “radius” and “strength” until the subjects are “standing out” from the background and gives a lasting impession.
D:\Users\s41764\Desktop\laser cut stuff\ribbet2.PNG
Step4: save the manipulated photo on the computer as *.JPG.
Step5: On the computer that is connected to the laser cutter, use coreldraw to create a new canvas of the type “fusion table”. Open the manipulated photo in coreldraw, position the photo such that it corresponds to the piece of wood where it will be laser cut. Select the box drawing tool on the LHS and enclosed it on the picture. Then select the line thickness of the box to be “hairline”. This setting corresponds to cutting a box shape surrounding the photo. The following diagram explains it all.
Step6. Load the piece of wood into the laser cutter
Step7. It is crucial to ensure the canvas chosen for laser cutting is of the type “Fusion Table”. File-> print OR Press on the “print” logo. A popup box will then appear. Ensure that the printer is “Epilog” and not your regular paper printer, and then click on preference to modify parameters that are essential to the quality of the laser cutting output. The following diagram illustrates it.
Step8. Select laser cutting parameters such as thickness of the material, job type, speed, power, and frequency and then press “OK”. Each of the manufacturers has meted out recommended settings to the parameters in a lookup table form for different type of material. In this guide, a 5mm thick plywood is used. Assuming the output of this laser cutting is very faint or hardly noticeable, it is recommended to crank up the power and lower down the speed. Otherwise if the output of this laser cutting appears to be burnt at the edges.
Step9: Close the protective cover of the laser cutter with the wood properly aligned in it and then press “GO” on the control panel. Observe the magic!
Brought to you by FabLab@SP