Monday, December 31, 2012

coming to an end of 2012

A self reflection??!! I just remembered to write about the sous vide stuff with Arduino. (BRING ON THE YUMMEH) DIY arduino Sous vide shield + code + cooking + ACTION
close up shot
The setup. I am using my HTC desire phone charger to power on the system instead. When i am using my 12V 1A DC supply from the wall, the temperature reading is way crazy. SUPRISE!! I am getting readings with very wide fluctuations. The LM35 is power by the 5V from the arduino. I suspect is the onboard voltage regulator might be giving way, but no way to verify because I do not have a digital multimeter with me now. When development was done, it was supply with 5V USB from a laptop. It is important to test your system with both the intended supply and also the USB supply. sous vide lamb shoulder 57degC for 24hour.
sous vide beef brisket 75 degC for 24 hour
Details of making this shield, check out the instructables by my padawans (keyou + suan) Instructables Here code here

Thursday, October 11, 2012

repartition disk ubuntu 12.04 in vmware with GParted

I was playing with my linux and unix VMs (vmware workstation 9) to setup for my lab environment, for the purpose of my lab session. I am surviving with only my dell XPS which runs on win7 Enterprise :( While playing setting up, there were 2 main obstacles that made me a "dumbledore"  moment.

In this session, I shall highlight the guide to solve one of the obstacles. The other is with wxwidget, which I will cover soon.

When I was creating a VM for ubuntu 12.04, at the option to select disk space, I only create a VMDK of only 4GB. This is because I am trying to save on the HDD space on my dell XPS. Installation went well, until i booted up and start to compile and run my code. To my horror, my free space in ubuntu is left with 127MB, that is after several sudo apt-get of the necessary software. A quick df -h showed me the details of the HDD space use.  Therefore, I need to increase the VMDK size (by 1GB hahaha... I am damn ngiao[petty] OK!).  

Few steps to complete this.
1. Power off the guest OS VM (e.g Ubuntu 12.04). 
2. Change the Hardware setting of the VM to XXX GB (as required).
3. Download GParted iso (opensource disk utility) on the host OS.
4. Power on guest OS VM
5. mount 3. 
6. restart ubuntu 12.04 (click shutdown from dashboard, in the popup on the LHS, there is a restart)
7. while rebooting press F2 on the vm boot sequece to go into the pseudo bios scree.
8. change the boot sequence by moving CD Rom to the top (it contains the GParted) and save before exit
9. continue to boot as usual and you will be greeted by the GParted GUI (unless you have choosen otherwise during the startup dialog)
10. Use GParted to resize the partition and then reboot

the dumb moment..... I am trying to make sense out of the google research I did on using GParted at step10. None of the results user guides are detailed enough to help a layman (e.g me) to use it. After some experimentation based on the steps given by others and recalling my prior experience, I managed to deduce the steps to assign the unallocated space created from VM workstation and resize it to be larger.

**Rules of thumb: Never delete the boot partition on the LHS. Always compact the partition on the RHS of the boot partition by 1.Delete partition (s) to the RHS of the boot partition. 2. Combining unallocated space. 3. Resizing of boot partition will always take the unallocated space from the RHS of the boot partitition. 

Explore the partition information. In this screenshot from my VM, my unallocated is at the extreme RHS, which is not sequentially next to the boot partition. 


Right Click on linux swap partition, then click on information. Check that partition is swap-off (e.g the swap-on option is waiting for you to enable, DO NOT click it). Right click again to delete the linux swap partition (/dev/sda5) and then right click on /dev/sda2 to delete the extended partition. The final output will be the screen above. Note that my unallocated space became 2GB from 1 GB.
Right Click on the boot partition and click on resize. The popup window appeared to allow adjusting of the hdd size by sliding the vertical bar or changing the new size parameter. I leave 1GB for the linux swap partition. To finalize all the new settings, click on the OK button. 


Next, click on the remaining unallocated space and assign it to be extended partition, such that logical partition can be created in it. Review the lower window on the actions to be executed. Once finalize click on the apply button.


Fingers crossed.....


Reboot to guest OS and double check the size of the partition by issuing sudo fdisk -l


Monday, October 8, 2012

Back to School: Java OOP Challenge

Alright guys, in another 1 week time it will be Back to School!!! Exited? Sad? Holidays are too short? forgot what that was taught last semester?

Well, it is always good to keep your practical skills honed, especially those that you need in the new academic semester. *make a guess, what skills are important?  I have this hypothesis that my tech skills will suffer from deterioration over the LONG holidays IF i do not use them. Therefore, I always look for / create some opportunities to make use of my skill set.

I have taught programming Java1 and Java2, and C++ over the last few semesters. I really hope you guys still remember what it takes to write a proper piece of code to solve a certain problem/situation/scenario. Now, I am going to give you guys a head's up before the school starts and hopefully to prevent the whole "new" process of running amok and panicky to learn back on what has been taught and practiced. 

The terms remained the same as per the last challenge. Trust me, the 3 weeks of wait for postage will be not in vain. Hey, you got something from => ME!

The first 3 SP students that responded with your OWN thoughts that were translated into code shall get a post card signed by yours truly and sent via snail mail from London, UK. You need to do a POC (via snipt.net, paste on my Facebook post) + FCFS only.  
If you are a year1 sem2 student or year2 stage B student (minimal programming experience) that attempt at this question and manage to complete it, drop me a message. I will make sure you will get some goodies sent from London!

Now, the question statements

Using OOP concept, design the classes and create a "cmd prompt style" calculator that does the basic operation, e.g add, substract, multiply, division, and with the proper exception handling. The user need to be able to enter this expression "a + b" to operate the software. Next, using the same OOP concept create a ScientificCalculator that adds a new feature of calculating a power to an integer, e.g x^m. Use any language of your choice, Java, C++, Python, etc


the source code is for reference only. You are strongly encourage to write one with your own thoughts (to claim the prize of course!).


Friday, October 5, 2012

Liquid Nitrogen made my Ice cream~~~~

Sunday, September 30, 2012

sous vide ala ghetto

I have been cooking ala sous vide for the last few days, using my ghetto setup.
 breakfast, eggs on toast. eggs sous vide at 63degC for 45min. cooked in a batch and then kept in freezer.

Lunch is too expensive, It will cost at a minimum about GBP10.... so I am skipping it. Just to give a matter of perspective, 300g of pork chop is GBP1.79


Dinner. Usually I would Sous vide the meat and later chill it in the fridge. After I am back from school, i would pop some into hot water bath . Once it is properly warmed to the desired temperature, in it goes to the hot skillet for the malliard reaction. 

Sous vide chicken thigh at 71degC for 2 Hr

sous vide pork chop at 57degC for 2Hr

Tefal frying pan is awesome!~


Watch out this space for sous vide beef rump (GBP1.99) and also bacon joint (GBP2.39)! 

Parsing or Word-Rip Alice-in-Wonderland, A programming methodology

Data need to be parsed very often into a form that is understandable by a software. Data parsing is most familiar with the computer science students, usually, data need to change form among different system. The sample operation below describes the methodology of word ripping the famed novel, Alice in Wonder land to 1. count the number of words and 2. determine word frequency 3. sort the word frequency.

Critical Analyzing the sample problem, and possibly break down this word rip operation into several sub steps. This is the most classic divide an conquer approach. First would be to determine the weapon of choice from the arsenal. Be it C++, C#, Java, Python, Haskell and etc. In this example where there is no preference for the language needed, hence the tie breaker would be the familiarity with the API. Using API definitely reduce the time to market (TTM), then custom writing another whole new library. In my example, Java is preferred.

Next, the "coding" part. Never-Ever-Jump-Straight-In! Give some thought on the process of word rip. Data need to be acquired, data need to be parsed, data need to be stored (in memory , data need to be manipulated and lastly data need to be output to a file physically. AH.... all look so familiar isn't it! At this point of time, locate the possible use of the API and make a mental (or physically writing it down) note about it. This is also the time where UML case and also class diagram can be drawn.

 Assuming the novel could be put into the same directory of the *.class file, this would same some time in programming, i.e, no need to import java.net.* and thus skipping the myriad of networking related troubleshooting for the code to access to the Internet. Reading in the data file, this should be familiar. With the Java.io.File class. The logical next step will be thinking on how to count the number of words (without the punctuation marks), what variables need to be declared and what type of control structure need to be used? Hint* while loop till the end of file, increase the counter for each word found. Compile and Print out. Troubleshoot as necessary.

Congratulations for coming this far. It means that you have completed the first iteration of counting words using next() [which ignoring punctuation marks]. Now, come the interesting bit. How to 1. remove the punctuation mars, 2.store the words 3.count the frequency of the words. Few assumptions need to be made. i.e Word and w0rd; text-ing and texting is 2 unique an etc. item 1 can be dealt separately first, but the choice made for 2. will directly impact the way the code written for 3.

REGEX and greedy comparison. I am assuming you guys are familiar with Java String class API and the replaceAll() method call. Since the need is to rip out the words (alphabets and numbers), minus the punctuation marks. I started with the most classic one replaceAll("[^A-Za-z]", "");  on close examining of the processed outputs, there are a few missed bits and blobs of punctuation mark remained. From the output, it will be naked to the untrained eye (on what need to be spotted). Do look out for patterns, such as repeating type of punctuation marks, syntax (format) of the words that fall in-between the data parser and then back to the programming<-run->debug cycle. Eventually, there might be a conclusion. Different train of thoughts will definitely leads to a different code. Some might be tempted to bail out; Some might look for other possible API to use, and etc. </-run->

Choice of 2. will impact 3. For an example, if array was used, and since array can only store 1 item in each allocated memory block. Logically it would lead to several outcome, such as OOP style i.e creating a class with 2 variables. creating 2 arrays, one for storing words and one for storing frequency. using more advanced data structures. The algorithm is pretty much straight forward. check whether is the first occurance. if not, increase the word-count, else insert the word and with word-count =1.

The efficiency of the code will be hampered by the type of data structure chosen. For an example, let say one array is used to store words, the code need to loop through the array to find a similar word. That is O(n) and the worst case scenario will be looping through the entire array. Since the words come in a random, and the array content not sorted, just to make the matter worst. Let say there is a match for the same word, the count need to be increased. Then it will be another loop through the word-count array, that is another O(n). Most likely this piece of code is implemented in an O(n^2) fashion. Is there a better way that can achieve O(1)?? [don't peek at my code yet, research about data structures, particularly the map]. Why I know to use a HMAP, it boils down to 2 things. I read about it, and I used it before. The worst thing you guys might be facing is "Ï heard it before (from some random conversation)", then it will be just another round of wild goose chase.

As for the sorting by frequency of words, again the choice of data structure made earlier affects the options available later. Hint* use Java.Collections


The first 3 SP students that respond with your OWN thoughts that were translated into code shall get a post card signed by me and snail mail from London, UK. POC + FCFS only.


code, enjoy!
just incase the embed fail... https://snipt.net/teos0009/alice-java-rip-file-out/?key=7b596e4ec720813b7b35e4eac8ee9992


Monday, September 24, 2012

Ghetto Sous Vide Salmon on the tap, and reflecting on my poor wallet

It has been some time since I last updated. Finally I have landed in the UK. All looked distant and yet I felt I have been here before. The deja-vu was through one of my good habits: reading. I read from The GB Encyclopedia since young; Wikipedia when I grew older, and  living in THE moment for now. All felt so surreal to be close to what I have read, but yet, the reality of lacking $$$ comes cold and hard. Everything comes with a price.

Cooked food, rental, transport and coffee are really expensive here. But thank goodness raw material is dirt cheap (in a way, compare relatively to what I used to pay). FYI: 1 trip to uni via the tube cost me GBP4, which is SGD8. In retrospect every month I only top-up EZlink (equivalent to Oyster pay per go) 45SGD round trip between SP and bukit batok. You do the maths. 1 serving of yucky "chinese" fried rice with chicken from a stall cost GBP5, compared relatively to a serving of chicken rice that goes for only SGD2.8 from a regular stall in SG. Proper sit down lunch would cost around GBP25, excluding the tips or gratitude fee. Fast food joint such as KFC, almost the same price for a standard 2 piece meal: GBP3.99 vs SGD7.40 (SP is SGD6.40)

It has been hard on the wallet, surviving without monthly pay nor maintenance fee....I never bother to look at the price tag of the items I am buying prior to this. Nowadays, I would mentally sum up my purchases before committing. Stay hungry, stay foolish. Quoted ad verbtim SteveJ. Cold food is the cheapest. After eating cold healthy food (cereals, bread, oats) for the last few days and living like a HOBO, the lack of FIRE and malliard reacted protein have cost me my health dearly. the FORCE is weak in this one.

It is FIGHT or FLIGHT; yet still need to keep the pounds and penny within sensible range.

Here comes my GBP3 salmon dinner ala Ghetto Sous Vide on the tap!
I came across a tap that is spewing really hot water and this strucked me. I quickly whipped out my LM35 and arduino setup and presto! It registers 60+- deg C.

Brine the salmon in a 10% salt solution (salt courtesy of KFC) for 45min. Look for some sandwich bags (which is ziplock bag) to put the salmon and seasoning. I have used thyme (courtesy of a garden i passed by) and pepper (courtesy of BK) to season. Use water displacement technique to vacuum seal the salmon in a pouch. Due to the limit of 23KG luggage, i did not get to bring my vacuum setup :(

set up water bath for 55degC (by mixing hot and cold water), turn on the hot tap and let the hot water trickle into the cooking vessel (thermodynamics: loss heat must be replaced). Earthen ware is recommended for heat retention. Sous vide the salmon 55degC for 15-20min

close up of the cooking from a tap....


must resist the temptation.... the process is not completed yet.


un-bag the salmon and pat dry. heat up the skillet and ready for crispy-ing the salmon skin.


Since the budget for dinner is only GBP3, I used up for salmon. Hence, no greens, starch nor soup.


close-up


The salmon flesh practically just melted in my mouth. The crispy skin gave me a recollection of what proper hot food supposed to be. I felt HUMAN again, despite the lack in a standard British grub that made up of a meat and 2 vegetables.

BTW, i am available for HIRE. According to labour laws, I can only work for 20hours (officially). If you need a butler, cook, body guard, computer/IT technician, plumber, EE engineer, toilet cleaner, room cleaner, ping me.

Saturday, July 28, 2012

[IoT] DIY “Solar” air conditioning with Data monitoring over the Internet


[IoT] DIY “Solar” air conditioning with Data monitoring over the Internet

There are a couple of people that help in a way to make my stay in the office on a Saturday afternoon less miserable. This DIY “solar” air conditioning came about when my puny fan puffing helplessly in my office trying to make the ambience comfortable is less than sufficient. I am self proclaimed a not demanding person, but the hot and humid weather out there is making things worst in a room without a/c over the weekends. Thanks to Mr.Napon for salvaging the aquarium pump, BIG A$$ 12V 1A DC fan and much more and by chance I discover it while “kay poh” in the FYP lab; Mr.Monitr for the salvaging the V10, and Gemini CPU cooler, both made by CoolerMaster. My students Sam, Hon for the man-hours (*read* manual labour) and polystyrene ice box courtesy of Suanzhi.

What I am trying to attempt here is to convert the hot and humid air in my office, into cool dry air. I observe that my metal water bottle once filled with icy cold water, condensation will occur when I am walking back to the office from the water cooler (it is located out-doors). Therefore, having copper pipes to run icy water circulating through the aluminium heat sink while hot air is being drawn to the chilled metal surface, condensation will occur. The condensed water will then drip into the ice box filled with ice packs and water. For instant gratification of Cool Air, an DC fan is used as an exhaust. Simple right? But, it is only good for 2. There are still no scientific data captured to justify the duration needed to cool down my small office of 35m^2, nor thermo dynamic modelling of this sort of Air conditioning. What I am trying to achieve is, over some extended period of time the room temperature and ice box temperature will reach an equilibrium, effectively bringing down the temperature of the room. More info here http://en.wikipedia.org/wiki/Heat_equation

What makes it solar then??? Well, if the Solar panels are used to provide 12v to the dc fan and dc pump in this setup, isn’t that “solar air conditioning”.

Stuff that you might need
2x BIG DC fan 1x Aquarium pump (preferably DC pump it you happened to have one lying around) 1x CPU Heatsink 1x copper pipe 
1x polystyrene ice box
Nx reusable ice pack (I got mine from Daiso for $2 each, I got 20 of them. Yeay~) 
** solar panels (Optional) 
Procedure 
Chill the ice packs in the freezer compartment for over 12 hours. On polystyrene ice box, make 2 holes to accommodate hot air intake and cool air exhaust DC fans. On CPU heat sink attach the bent copper pipe, welding is out of my means, hence cable ties FTW~! Attach aquarium pump to copper pipe, the connector is modified from a furniture stopper. Turn On to Enjoy!


Ice packs in the polystyrene box. Show here 10 only.
LHS DC fan with heatsink is drawing hot & humid air into the cold chamber, RHS is cool air exhaust.


Poor man’s make shift air duct. I still can’t get my paws on proper A/C duct.


That’s the hot air intake side.


The LM35 is hooked up to an arduino and connected to internet for data monitoring over at my blog.
Without the air conditioning, it is 30 to 31degC in my office, according to the data acquired by LM35. While assembling this setup, I sweat through one tshirt..... it is dripping wet.............


The temperature logged at the cool air exhaust side of this set up is at a cool 25degC, not bad for a cheapo setup.
The room temperature is recorded at 30dec still, after 30minutes of operation.


the out the data acquired over the Internet and display at the blog.
Well, this poorman’s A/C is suitable of cooling 1to2 ppl down, close to the proximity of the cool air exhaust but not powerful to cool down a whole room per say.
I am off to the secret lab at T9 with 24x7 access and facilities to observe the room temperature of my office. Teeheeheee. video for the cooling in action

Thursday, July 26, 2012

[IoT] How to stream temperature sensor data over the Internet


Fancy some IoT stuff???
I just made a temperature monitoring over the internet using a suite of Open Source software and hardware over the last few days. What triggered me was the youtube video on sensormonkey on hooking up a sensor and published the sensor data live over the Internet. The most intriguing part was, it comes with Public and Private key pair for use with public and private sensors. The video demo for the potentiometer was done using local, i.e 127.0.0.1 and later videos were on the owner’s Internet server. There is a possible gap that needs to be address, which is publishing sensor data over publicly available and FREE web publishing services. Particularly in this example of mine, publishing the temperature sensor data over my blog.

The reason for me to do so? Usually I am at a dilemma of coming to office to work over the weekends. The central air-cond that powered the whole block of T15 (7 floors, each floor with 6 tutorial rooms, each room with 3 aircond unit) will not be turned on for MY CONSUMPTION. Working in a stuffy, HOT & HUMID office can be counterproductive, with my small little pathetic fan puff helplessly to cool down. Nonetheless, work still need to be done.  Sometimes, there are events that are running here and I will get to enjoy the cool working environment and achieve UBER PRODUCTIVITY. But it is a hit and miss situation. Having this Open Source Temperature Monitoring of my Office over the Internet, I can make a well informed choice on where to work.

The flow of connection will be as below.
LM35->Arduino ->computer->bloom->sensormonkey->processing.js->blogspot

Stuffs that you might need to do this experiment

  1. Arduino www.arduino.cc , and a LM35 temperature sensor connected to A0. It is the hardware that acquire real world data and digitizing it for Internet consumption.
  2. Bloom http://sensormonkey.eeng.nuim.ie/index.php/site/page?view=support.bloom bridge the gap between serial data and TCP/IP data.
  3. Sensormonkey http://sensormonkey.eeng.nuim.ie (thanks for the awesome introduction and tutorial) provides the platform to publish data on the Internet
  4. Processing.js , sister of processing; provides the visualization of the sensor data
  5. Blogspot.com , web blog
At the background, several services are required. www.dropbox.com to host the processing.js file, and processing IDE to compile the code for *.pde

The whole procedure start by programming the LM35 on Arduino, Configuring bloom, setting up sensormonkey, programming the javascript and pde and finally host it on a blog. One point to note, to ensure data is continuously stream over the Internet, remain signed-in on sensormonkey, do not close the sensormonkey page, do not stop bloom, do not disconnect arduino from computer and finally, do not turn off the computer. PHEWWWW……

Sounds Complicated to IoT your sensor data on a blog??!!!? LOLx
It took me a few days, but I only get to work on it after office hours for maybe 1-2 hours each day. It ranges from figuring “how-it-works” to installation, troubleshooting and finally deployment. Be sure to check out the comments in the source code for the explanation.


  1. Connecting LM35 to Arduino
Connect the pins accordingly to A0, 5V and Gnd on the LM35.
Check out the code on snipt.net

  1. Download and Install Bloom, URL from above.
    Click next to continue

    After installation, this icon will appear on your desktop.


    Do a preliminary test with bloom, make sure your serial device is connected. Mine is a dummy serial on com4 with port 41888. The port number, use one that is ephemeral range, which is
     49152 to 65535, recommended by IANA. But, I like the number 41888 very much. LOL. Do not use the range <1024, it might conflict with existing application with networking capabilities.

Check out the configuration, taking special notice to parameters marked with a red tick.


3. Login to sensormonkey website with your Facebook account.

Click on sensors, follow by launch sensormonkey control panel and you will be greeted by the screen below.

Configure your ports (TCP/IP and serial) accordingly. My arduino resides at COM35, yours might be different. Use 9600-8-N-1, failing to match the parameters both side will result in data corruption. So, if you would like to use 115200 instead, remember to change accordingly in code for arduino and also bloom.
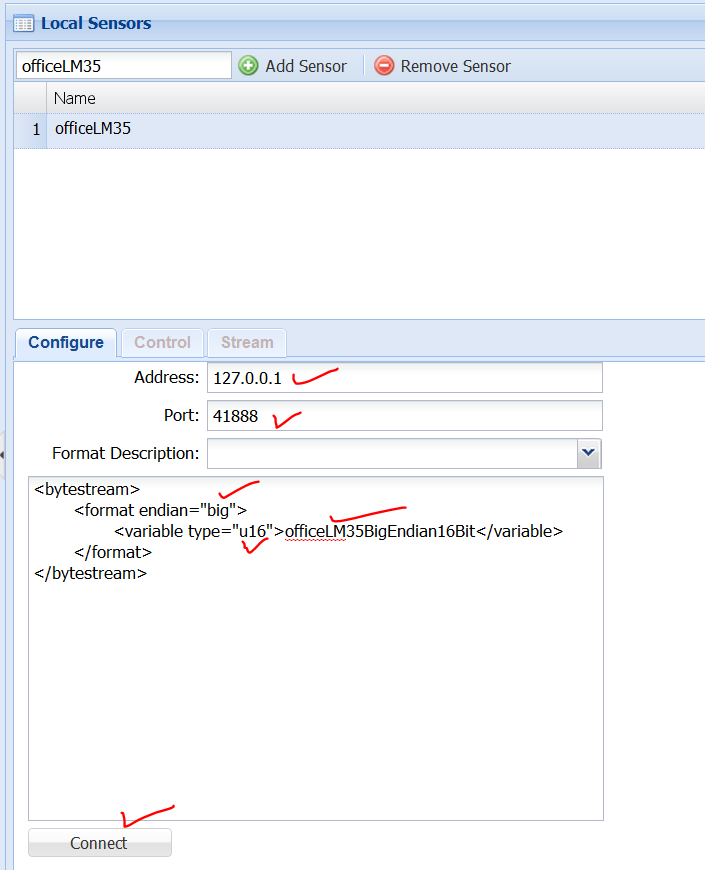
Next, enter the name for the sensor. I find this naming too ambiguous. It should be the name of the board/device instead of sensor. I made a mistake of naming all of the variables officeLM35 and had a problem at a later stage programming the *.js and *.pde. After naming the sensor, the following screen appear


Configure the sensor. On arduino, the code is Big Endian, 16bit and MSB is always transmitted first. The variable name “officeLM35BigEndian16Bit” does matter, because it will be used in the *.js. The variable name was changed to something meaningful at the later part.

The final configuration for my office temprature sensor as seen here http://shin-ajaran.blogspot.sg/2012/07/drive-webpage-on-blogspot-in-real-time.html
Sensor name @ local sensor: myOffice
add sensor: officeLM35
sensor configured to use js graph: myLM35

Click on connect.

Click on the icon circle in red to observe the data. I took the liberty of modifying the colours, just for experimenting.
To publish the sensor on the Internet as a public, follow the following screen.


One the data is publish on the local sensor panel proceed to publish it for remote streaming

Click on the remote sensor and click subscribe

Once all the above are done, there are several things to take note of. Go to the sensormonkey website and locate your Public key, private key and namespace. These data will be used in conjunction of your  streaming data.

4. Testing of data streaming with local HTML5 file
Download processing.js and place in the same folder as the *.html file
Downlod processing and compile the file as Graph.pde and place in the same folder as the *.html file.
Check out the html5 code hosted on snipt. You are good to go.
HTML5 rox~!
in your html code, the path to the processing.js and Graph.pde is important, reflect accordingly. Another thing to add, this is indicated as method1 on the processing.org/learning


The weird part, the *.html opens in firefox, but not chrome nor IE.

If you notice that, the streaming data is always 100 (for degC). The problem lies with the variable naming in sensormonkey , *.js and *.html
When the page is closed, a pop-up box will appear.
After troubleshooting the code…. Inferring is very important in troubleshooting software / code related issues.
SWEEET~!

Check out the final source code for the method2 implementation
5. Testing with blogspot.
After much tinkering with *.pde + *.js + *.html on blogspot, I came to the conclusion that method2 indicated on processing.org/learning is the workable solution. Heng arh!


Enjoy