Sunday, December 25, 2016

SPEEEduino v1.0 and the VooDoo sequence


At that moment in time, yours truly only have 1x working Arduino Uno lying around, and definitely could not do Arduino as ISP to burn bootloader into a new ATMega328p on the SPEEEduino. So he transplanted the ATMega328p what is in working condition from the Arduino Uno into SPEEEduino, assumes it will work straight out of the box, and start to program away. Fate took an unfortunate turn when he tries to download the code into SPEEEduino transplanted with ATMega328p.
yours truly was greeted with the legendary
"
avrdude: stk500_recv(): programmer is not responding
avrdude: stk500_getsync() attempt 1 of 10: not in sync: resp=0x47
"
he thought he had a batch of bricked PCB, but upon closer examinations he noticed the LED on pin13 blinks according to the example code downloaded via the Arduino Uno to verify the functionality of ATMega328p before the transplant.
Then he verified the following connection via continuity test
DTR->pin1(MCU)->C3=ok
tx(CP2102)->rx pin2(MCU)=ok
rx(CP2102->tx pin3(MCU)=ok
VCC(CP2102)->pin7(MCU)=ok
GND(CP2102)->pin8(MCU)=ok
Computing Environment
1. Win8.1, Arduino IDE 1.6.7. SPEEEduino with transplanted ATMega832p gave this error of avrdude: stk500_recv(): programmer is not responding
2. Ubuntu14, Arduino IDE 1.6.8. SPEEEduino with transplanted ATMega832p works out of the box in this environment.
A little consolation prize is needed to keep troubleshooting to solve the mystery of not working in windows environment, but works in linux environment.
If you landed on this page looking for solution for the legendary error of avrdude: stk500_recv(): programmer is not responding or avrdude: stk500_getsync() attempt 1 of 10: not in sync: resp=0x47 look no further than the next step where yours truly outlined the voodoo sequence. If you are interested to know the troubleshooting sequence, look further.
SPEEEduino is connected with CP2102 on a valid com port on a lenovo laptop running windows8.1 and Arduino IDE 1.5.6 r2 with verbose mode turn on upload via File->preferences
when you are about to press the "upload" button to compile and download the hex to the board, press and hold the "reset" button on SPEEEduino. upon seeing the first handshake "avrdude: Send: 0 [30] [20] ", release the reset button. you will now able to program the ATMega328p. refer to the screenshot for details.
this voodoo sequence seems to be counter intuitive, because Arduino Bootloader supports auto reset feature with a 0.1uF cap and 10K resistor is connected between the DTR line to the RST on ATMega328.
yours truly took a 2 days scraping the Internet forum posts, and experimenting on many laptops to be able to download the hex successfully.
this voodoo sequence is the workaround for the legendary error of avrdude: stk500_recv(): programmer is not responding or avrdude: stk500_getsync() attempt 1 of 10: not in sync: resp=0x0a
Good Riddance

Friday, October 7, 2016

ESP32 With Arduino IDE

Christmas 2015 yours truly was one of the lucky few in the world to receive theESP32 for experimenting. The board was not assembled, and it was quite intimidating to assemble the board with just a fine tip solder. The experiment is documented at this URL: http://www.instructables.com/id/Beginners-ESP32-Gu...
This afternoon, yours truly came across the Arduino Core for ESP32 on github URL here: https://github.com/espressif/arduino-esp32 . Very exited on this discovery, he was eager to experiment with it, but only when he is done with the consultations. If his STM serves him well, he recalled witnessing the exponential growth of IoT devices made with ESP8266 posted on the Internet, the ESP8266 board wars by the various board makers, professionals and amateurs alike. The growth was particular intriguing, especially after the ESP8266 development environment was ported from the regular GCC and make, to arduino IDE. He might relive the growth of ESP32, now with Arduino port.
After installing, the settings seems to be prim and proper. Check out the screenshot for details
The following was the setup environment for ESP32 with Arduino IDE
arduino IDE 1.6.5
Windows8
Python2.7


[UPDATE] The following setup that works: Ubuntu14.04 x86 desktop, Arduino IDE 1.6.12, python2.7


There is a gotcha moment; caveat emptor. [UPDATE] : works with Ubuntu14.04
This is a work in progress post. [UPDATE] : check out new screenshots
The instructions given in github is crystal clear
https://github.com/espressif/arduino-esp32 download the necessary files.
Here comes the fun bit, from the writeup it seems to be running off *nix. But since yours truly office laptop only comes with windows, he proceed nonetheless. Administrator rights needed to run the get.py
check out the screenshots for the details on win8.


Yours truly tried to compile the blink example with ESP32, but was greeted with this error.On hindsight, perhaps it is better to install in the following environment
Ubuntu14 or any other *nix distros

Ubuntu14.04 x86


Monday, June 27, 2016

Maker Faire Singapore 2016

Maker Faire Singapore 2016

Efforts in Maker community and education recognized by Singapore Ministers.  

24Jun16, Received 
“Certificate of Recognition for 5 years of continuous support & enthusiasm” from Dr. Vivian Balakrishnan Minister of Foreign Affairs.

25Jun16 Received “Certificate of Appreciation” from Dr. Yaacob Ibrahim Minister of Communications and Information

https://dl.dropboxusercontent.com/u/13507878/flex300-1.svg 

Wednesday, June 22, 2016

Fab Lab Fab Academy Final Project Software Defined Cooking with ESP8266

Fab Lab Fab Academy Final Project Software Defined Cooking with ESP8266

Software Defined Cooking with ESP8266

There is an idiom: the proof of the pudding is in eating it. Same applies to the successful implementation of Software Defined Cooking with ESP8266; the proof is in the egg and eating it. 

The objective of this final project to be submitted in due course for completion of Fab Academy 2016 is to design and fabricate an apparatus that display & control the temperature of a heated water bath (Sous Vide) over the Internet. DS18B20 acquire the temperature of the water bath, ESP8266 send this data via HTTP to thingspeak, and via MQTT to Node-Red server hosted on Cloud or VM. PID controller is defined in Node-Red with a set point. Output of PID is send via MQTT to ESP8266 to control the CPC1966B connected with heater.

Background

Ever since humans discovered fire to cook food. The desire to have tasty food hot, and ready to serve without significant labour contributed to the preparation is insatiable. Progressively over different period of time, the labour required to prepare food is contracted to another person whether specialized or otherwise. By logical extension of the idea of the labour is contracted out to prepare food for humans, here comes the robot cook. Hence the notion of Software Defined Cooking meant for robots or home appliances have to be defined. An industry framework is needed to define protocols, communication standards, recipe, dispensing of food items, quality assurance and etc for Software Defined Cooking. Through observations on demonstrations in CES over the years, the software defined cooking appliances meant for smart kitchens are implemented in product silos by the respective vendors. Appliances that do not interact with other makes of smart appliances, and human owners are nothing close to the ideals of a Software Defined Cooking. 

Some vendors have disrupted the market by inventing heating mechanism meant for cooking that is controllable by software. FreeScale have invented a “solid-state, high-power output, high-operating temperature radio frequency (RF) transmitter technology” to address software defined cooking. This articlehere explains the FreeScale RF solution and addresses the following issues: 
1. “Heating is difficult to control with both thermal (heat) and temporal (time) precision. Heating elements take time to heat, are frequently not calibrated to a precisely measured numeric temperature scale, and then take time to cool to lower temperatures.”; 
2. “It is extremely difficult to track the “doneness” state of the inside of food with precision.” 
3. “The feedback loop between sensing doneness and adjusting temperature has been performed mostly by human observation, judgement and labor throughout recorded human history.” 

The article above also outline three features of a Software Defined products 
A. “Gather and analyze sensor data.” 
B. ”Maintain peak performance and health based on sensor data analysis (feedback loop).” 
C. “Communicate their analysis with other software-define products and cloud services for continuous improvement.” Besides the highlights of the 3 issues and 3 features, the article mentioned above and the product video of RFSage, an innovative appliance utilizing the FreeScale RF technology did not communicate enough details for a layman to deduce whether the RF mentioned is used for both transferring heat and communicating cooking data between different make of smart appliances in the category of software defined cooking.

Proposal

A little more historical background. Back in 2011, I chanced upon sous vide while clicking away on cooking videos over the Internet, and saw a demo of thermal circulator in a chemistry lab, I have never looked back since. The essence of sous vide cooking is to maintain a water bath at precise temperature, with food placed in food safe bags submerged into this precise temperature controlled water bath. We started off with a store bought DIY kit that cost quite an arm and leg. We even went to the extent to make sous vide shield for Arduino. At that point in time, a dedicated sous vide supreme is out of the equation, it has to give way to tuition fee, rent, transport, and food. 

Sous vide solved two out of the three issues highlighted earlier. Doneness of the inside of the food is precise with sous vide, thus the inexperienced novice is spared from the labourious sensing doneness and adjusting temperature to prevent overcooking; hopefully stop food wasting from bad cooks. The other pressing issue is the calibration between heat transfer and time needed for heat to transfer is solved partially with some sous vide implementations. Some amateurish sous vide controller uses “bang-bang” algorithm for open feedback loop system, which is bad, really bad and hardly precise at the required set point. Some comes with PID controller, in which a controller for continuously adjusting the heat and time components in a closed feedback loop system. 

The three features mentioned above speaks of the cloud computing itself without mentioning the name. A server in the cloud will collect and collate information send by the sensors, perform computations on the data collected, transmit control to the actuators, and lastly communicate to user through the use of visualizations. 

Full implementation here: http://archive.fabacademy.org/archives/2016/fablabsingapore/students/100/project04.html

Friday, January 22, 2016

Fab Academy16


http://cba.mit.edu/events/03.05.fablab/fablab-dyd02.pdf  "This paper presents the composition and the rationale behind the creation of a network of fabrication laboratories, FAB LABs, whose mission is to provide concrete examples that would lay the foundation for a new framework for this reconceptualization. "


weekly builds and guides at http://archive.fabacademy.org/archives/2016/fablabsingapore/students/100/index.html

Saturday, January 2, 2016

Sous Vide sur Internet: Node-RED, MQTT, ESP8266

Sous Vide sur Internet: Node-RED, MQTT, ESP8266

Cooking over the Internet has always been my pet peeve. That is when I could marry two of my best loves, maybe into a product that pays. Sous Vide sur Internet, is in French, loosely translated to sous vide over the Internet. well, it doesn't takes much of my agar-logic to get the translation.

Just a little bit of trivia:
Back in 2010, 2 of my padawans are working on a Final Year Project making a web2.0 smart fridge that tracks item in the fridge by QR code follow by suggesting a youtube cooking video based on the items in the smart fridge. When DIY Sous Vide is all the rage on the Internet, I have my own fair share of experiments with sous vide with a myriad of implementations. Back in 2012, one of my padawans took it up the challenge to build a sous vide shield for arduino http://shin-ajaran.blogspot.sg/2012/12/coming-to-end-of-2012.html.

Fast forward to 2016, The notion of Internet Enabling dumb devices aka household appliances is all in the rage. The release of ESP8266, a very cheap (USD4 at Dec2014) WiFi enabled microcontroller has kick start a whole plethora of IoT devices fuelling the development of devices once seem dumb. The Maker's IoT Kit and the detail step by step guide on how to use ESP8266, maker IoT Kit break out board with arduino IDE located here http://shin-ajaran.blogspot.sg/2015/11/makers-iot-kit-for-esp8266-esp-01.html is one such enabler to make dumb terminals smart by connecting to the Internet.

Having the ESP8266, the Maker's IoT Kit for ESP8266 is only one third of the whole picture of the end to end IoT solution.

The complete end to end IoT solution will have 3 parts,
1. the Internet Enabled device with sensors
2. the computing and data aggregation platform aka cloud computing
3. the visualization over the Internet

Earlier, the Internet Enabled sensor was addressed in this post in detail http://shin-ajaran.blogspot.sg/2015/11/makers-iot-kit-for-esp8266-esp-01.html. The visualization of data was addressed in an earlier post too http://shin-ajaran.blogspot.sg/2015/09/stream-iot-sensor-data-esp8266-nodemcu.html, via thingspeak.

The computing and data aggregation platform is the gist of this guide. In the earlier post, the protocol of chose to stream data is via HTTP. There are pros & cons associated with this protocol in the implementation of IoT end to end solution, this post is not going to delve deep into the discussion of it. Assuming there are 1000000 IoT devices, quite chatty (in terms of data transmission) talking to a data aggregation server (assume to have 1 server in this discussion) concurrently via HTTP. The server might run into a resource squeeze after N-th connection. Hence MQTT comes to the rescue. MQTT is an "archaic" protocol (invented in 1999 by scientist working for IBM), partially revived by engineers working in Facebook for the real-time messaging function https://www.facebook.com/notes/facebook-engineering/building-facebook-messenger/10150259350998920/ .  MQTT follows a PubSub model, where sensors subscribed to a "topic" to listen to control command or publish to a "topic" to stream data to the data aggregation server.

Some readers informed me of the broken URL to screenshots hosted off Dropbox. It seems Dropbox no longer support hosting resources directly with unique URL. Please download directly instead https://www.dropbox.com/sh/q0iclluewfx49fs/AAASt4Uw8GB4VgEuHGQPEJEta?dl=0

In this guide, several software components are needed, on top of the hardware component Maker's IoT Kit for ESP8266.

Software needed
1. Ubuntu Server 14.04 on a physical computer or virtual machine on the cloud
2. MQTT protocol, the broker used here is mosquito MQTT http://mosquitto.org/
3. Node-RED as the data aggregation platform http://nodered.org/

The instructions to install the software on ubuntu is at the footer of this guide.

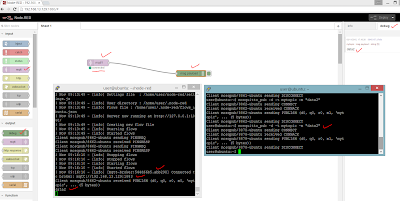
In the diagram above, the putty window on the right is the MQTT client, publishing data "data2" to the MQTT broker which is the putty window on the left. Node-RED is in the background, capturing the data transmission from MQTT client and MQTT broker, and it gives a visual on the "wiring" of the end to end IoT solution,

The Diagram follows the same arrangement as the previous, but with the addition of an ESP8266 enabled with temperature sensor to stream temperature data to thingspeak via HTTP, and to Node-RED via MQTT. We now have an end to end IoT Solution. but wait, it is unidirectional. the data only travels from the IoT sensor to the data aggregation server, but not the other way round. control needs to be issued from a server, just to complete the bidirectional communication possibly for an IoT solution.
Setting up the corresponding MQTT broker on Node-RED is very easy. simply drag the MQTT icon from the left hand side, and place it in the "canvas". edit the MQTT broker parameters accordingly.

Node-RED provides a visualization of IoT device, data aggregation, and it's connection, MQTT would function too. The above diagram describes the MQTT broker and the MQTT client in action.
The diagram above describes the Node-Red in operation, and the step by step guide to install additional "nodes" aka functionality to Node-Red
The diagram above describes the successful addition of a PID controller for Node-RED.
Are you thinking of what i am thinking? YES, cooking sous vide over Internet!! IoT sensor send the temperature of the cooking to Node-Red via MQTT. The computation of the PID based on the receive temperature data and the set point is offloaded from the ESP8266 to the Node-RED that is hosted on a virtual machine with much more muscle power as compared relatively. The delta, i.e turning on the heating element is the command to be sent from the computing platform to the ESP8266 IoT sensor that controls the relay. 

The source code for the ESP8266 temperature control and relay control is available at the footer. The above diagram describes the detail of the upload.


The above diagram describes the wiring of the Maker's IoT kit for ESP8266 to a multiplug modified with a solid state relay. The step by step guide of making the SSR plug is here http://shin-ajaran.blogspot.sg/2014/11/iot-inspired-multi-plug-modified-with.html or here http://www.instructables.com/id/IoT-inspired-multiplug-using-SSR/

The following diagrams describe the testing of the Sous Vide over Internet setup with Maker's IoT Kit for ESP8266, MQTT, and Node-RED 
data aggregation and computation on Node-RED, data visualization on thingspeak
testing of the set point at 30degC

tuning parameters for PID
comparing the data output on serial from ESP8266, and Node-RED


asasdfa
ESP8266 MQTT and ThingSpeak code here:

Node-RED setup here: