Sunday, January 6, 2013

Complicated Chips

Inspired by Heston Blumenthal's Triple Cooked Chips, I just have to do this while my time is still mine.

I generalized it into THREE steps in total.
1. simmer potatoes at  65 degC for 30mins, then cool in a freezer for at least an hour.
2. fry in warm oil at 130degC for 5mins, then cool in a freezer for at least an hour.
3. fry in hot oil at 190degC for 7 mins, serve.

After executing the task. I came to realized that the preparation and procedures are quite complicated and required lots of tweaking. Furthermore, without the thermometer cooking is really guesstimation or what the Singapore people would say : Agaklogic. 

If you asked me is it worth the effort? Yes, if time allows. Yes, if this process can be automated. Yes, if the products can be prefabricated. Sounds like an engineering challenge? heheheheehe

Methods:
1. wash and the cut the potatoes into thick cuts. wash under running water for few minutes to remove the starch.
2. Bring a pot of water to boil, simmer the potato chips at 65degC to 75degC. Potatoes are more forgiving and less temperamental. No pun intended! If the water is getting hotter, turn off the gas knob for a while. Use a thermometer. Mine is capable of -50degC to 300degC. It cost me £19.90 from Maplin, but totally worth and the first equipment to be purchased to pursue molecular gastronomy. 
The potatoes are simmering at 68.8 degC
3. Rinse the potato from excess water.

4. Using an oil splatter guard, I fan out the chips on it. Such that each piece of chips have a chance to remove the moisture while sitting pretty in the freezer.

5. There might be excess water droplets. 

6. Freeze it over night. This is how it looked like in the morning.

7. Heat a pot of oil to 130degC. Some cook book will say fill with X amount of oil and etc. Now the tricky bit. The amount of oil should be sufficient to cover the chips in it. So, fry in small batches.  The next tricky bit. If you put too much oil and overly guesstimate the volume of potatoes going into it and there will an overflow of oil. If you are using a naked flame for cooking, good luck with the fire extinguisher. If not, huge mess to clean up. Word of caution: If scalded, use cold running water to remove the heat on the affected area. This will prevent the heat from penetrating the dermis, causing further injuries and will take even longer to heal.     

Oil is at 133.4degC

8. The objective is to heat the chips at 130degC consistently. If the chips are at room temperature, the oil temperature should not be higher then the ideal temperature. If the chips are cook from chilled state, significant heat loss will occur.  It will take longer then the stated ideal cooking time and hence oil soaked chips. Maybe some heat exchange expert can explain the thermodynamics of the chilled chips entering hot oil and the time constant needed to reach the desired temperature?
Oil is at 117.1degC with chips in it.

9. It took about 4mins to reach the ideal heat of 130degC. In other words, the chips are spending longer then required time (about 8minutes in total) in the oil.
Oil is at 130.3degC after 4 mins of cooking on high heat


 10. The chips soaked in warm oil will look nicer then the uncooked ones. Excess oil is drained on kitchen towel. It can be stored in the freezer for later use. 
comparison of chips
close up of chips cooked at 130degC


11. Move the drained chips to the freezer and freeze for at least an hour.

12. When ready to cook the chips, heat the oil to the desired temperature of 190degC. Since I am cooking from a frozen state, I heated it to 220degC to preempt sudden temperature drop. Once the temperature is at the desired state, turn the gas knob to maintain the temperature.

After the frozen chips went it, the temperature drop to 203degC. 


13. My chips looked orangey, nothing close to the golden brown colour i saw from Heston's show on BBC4. My speculation is the higher temperature I set at step 12.
Crispy exterior and a mash potato center at the same time.

14. Roast chicken and chips. The greens are for garnishing only.

15. Size does matters. I mean the cut of the chips for cooking with this method.

16. Washing is such a chore. The massive amount of grease stained plates, sieves, pots, and etc to wash is a nightmare.


Monday, December 31, 2012

coming to an end of 2012

A self reflection??!! I just remembered to write about the sous vide stuff with Arduino. (BRING ON THE YUMMEH) DIY arduino Sous vide shield + code + cooking + ACTION
close up shot
The setup. I am using my HTC desire phone charger to power on the system instead. When i am using my 12V 1A DC supply from the wall, the temperature reading is way crazy. SUPRISE!! I am getting readings with very wide fluctuations. The LM35 is power by the 5V from the arduino. I suspect is the onboard voltage regulator might be giving way, but no way to verify because I do not have a digital multimeter with me now. When development was done, it was supply with 5V USB from a laptop. It is important to test your system with both the intended supply and also the USB supply. sous vide lamb shoulder 57degC for 24hour.
sous vide beef brisket 75 degC for 24 hour
Details of making this shield, check out the instructables by my padawans (keyou + suan) Instructables Here code here

Thursday, October 11, 2012

repartition disk ubuntu 12.04 in vmware with GParted

I was playing with my linux and unix VMs (vmware workstation 9) to setup for my lab environment, for the purpose of my lab session. I am surviving with only my dell XPS which runs on win7 Enterprise :( While playing setting up, there were 2 main obstacles that made me a "dumbledore"  moment.

In this session, I shall highlight the guide to solve one of the obstacles. The other is with wxwidget, which I will cover soon.

When I was creating a VM for ubuntu 12.04, at the option to select disk space, I only create a VMDK of only 4GB. This is because I am trying to save on the HDD space on my dell XPS. Installation went well, until i booted up and start to compile and run my code. To my horror, my free space in ubuntu is left with 127MB, that is after several sudo apt-get of the necessary software. A quick df -h showed me the details of the HDD space use.  Therefore, I need to increase the VMDK size (by 1GB hahaha... I am damn ngiao[petty] OK!).  

Few steps to complete this.
1. Power off the guest OS VM (e.g Ubuntu 12.04). 
2. Change the Hardware setting of the VM to XXX GB (as required).
3. Download GParted iso (opensource disk utility) on the host OS.
4. Power on guest OS VM
5. mount 3. 
6. restart ubuntu 12.04 (click shutdown from dashboard, in the popup on the LHS, there is a restart)
7. while rebooting press F2 on the vm boot sequece to go into the pseudo bios scree.
8. change the boot sequence by moving CD Rom to the top (it contains the GParted) and save before exit
9. continue to boot as usual and you will be greeted by the GParted GUI (unless you have choosen otherwise during the startup dialog)
10. Use GParted to resize the partition and then reboot

the dumb moment..... I am trying to make sense out of the google research I did on using GParted at step10. None of the results user guides are detailed enough to help a layman (e.g me) to use it. After some experimentation based on the steps given by others and recalling my prior experience, I managed to deduce the steps to assign the unallocated space created from VM workstation and resize it to be larger.

**Rules of thumb: Never delete the boot partition on the LHS. Always compact the partition on the RHS of the boot partition by 1.Delete partition (s) to the RHS of the boot partition. 2. Combining unallocated space. 3. Resizing of boot partition will always take the unallocated space from the RHS of the boot partitition. 

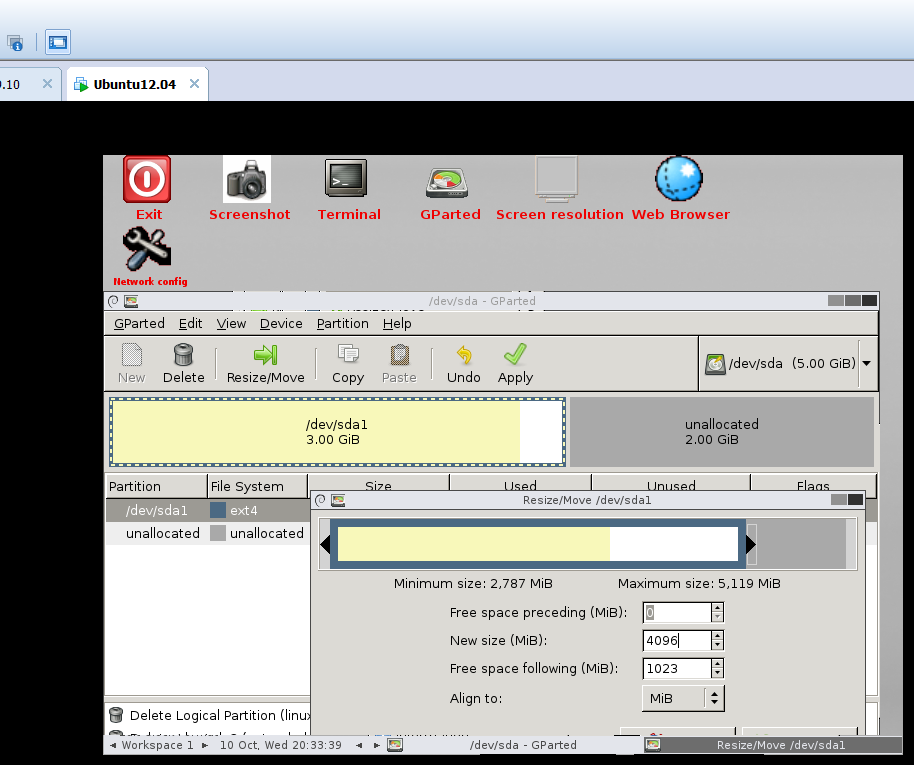
Explore the partition information. In this screenshot from my VM, my unallocated is at the extreme RHS, which is not sequentially next to the boot partition. 


Right Click on linux swap partition, then click on information. Check that partition is swap-off (e.g the swap-on option is waiting for you to enable, DO NOT click it). Right click again to delete the linux swap partition (/dev/sda5) and then right click on /dev/sda2 to delete the extended partition. The final output will be the screen above. Note that my unallocated space became 2GB from 1 GB.
Right Click on the boot partition and click on resize. The popup window appeared to allow adjusting of the hdd size by sliding the vertical bar or changing the new size parameter. I leave 1GB for the linux swap partition. To finalize all the new settings, click on the OK button. 


Next, click on the remaining unallocated space and assign it to be extended partition, such that logical partition can be created in it. Review the lower window on the actions to be executed. Once finalize click on the apply button.


Fingers crossed.....


Reboot to guest OS and double check the size of the partition by issuing sudo fdisk -l


Monday, October 8, 2012

Back to School: Java OOP Challenge

Alright guys, in another 1 week time it will be Back to School!!! Exited? Sad? Holidays are too short? forgot what that was taught last semester?

Well, it is always good to keep your practical skills honed, especially those that you need in the new academic semester. *make a guess, what skills are important?  I have this hypothesis that my tech skills will suffer from deterioration over the LONG holidays IF i do not use them. Therefore, I always look for / create some opportunities to make use of my skill set.

I have taught programming Java1 and Java2, and C++ over the last few semesters. I really hope you guys still remember what it takes to write a proper piece of code to solve a certain problem/situation/scenario. Now, I am going to give you guys a head's up before the school starts and hopefully to prevent the whole "new" process of running amok and panicky to learn back on what has been taught and practiced. 

The terms remained the same as per the last challenge. Trust me, the 3 weeks of wait for postage will be not in vain. Hey, you got something from => ME!

The first 3 SP students that responded with your OWN thoughts that were translated into code shall get a post card signed by yours truly and sent via snail mail from London, UK. You need to do a POC (via snipt.net, paste on my Facebook post) + FCFS only.  
If you are a year1 sem2 student or year2 stage B student (minimal programming experience) that attempt at this question and manage to complete it, drop me a message. I will make sure you will get some goodies sent from London!

Now, the question statements

Using OOP concept, design the classes and create a "cmd prompt style" calculator that does the basic operation, e.g add, substract, multiply, division, and with the proper exception handling. The user need to be able to enter this expression "a + b" to operate the software. Next, using the same OOP concept create a ScientificCalculator that adds a new feature of calculating a power to an integer, e.g x^m. Use any language of your choice, Java, C++, Python, etc


the source code is for reference only. You are strongly encourage to write one with your own thoughts (to claim the prize of course!).


Friday, October 5, 2012

Liquid Nitrogen made my Ice cream~~~~