For now, I am only as good as draped in loin cloth. The only possession I have is my laptop, and a mouse, and my newly acquired raspberry pi. I left my pi back then, knowing that I might not have the lux to enjoy the fun with it. So, it is going to be a paradigm shift for me on how to start to play with my new raspberry pi model b without a monitor and also without a keyboard (note:it is phrased such a way to be picked up by the search engine). Knowing that the raspberry pi comes with a SSH daemon started when it boots, this I can use to connect via PUTTY to do some configs from my laptop.
The objective is to configure my raspberry pi without a monitor, without a keyboard, such that my pi will auto login to the GUI, because I do not have a keyboard to type in user name password, and also to type startx on the console for the GUI; connect to available WiFi (again, keyboard is needed to enter wifi credentials), ready with a virtual keyboard (can't afford keyboard, ARGGHHH) at every opportunity I could get my paws on a monitor. I got the HDMI cables for a mere £1.99.
*using nano, Press Ctrl-X to exit, and then follow the on screen instruction to save the file*
Part1 getting ready to configure raspberry pi
1. Prep a straight cat5 cable to connect the laptop and also the pi
2. Configure laptop's ethernet to 192.168.0.1/24
3. plug in the SD card loaded with raspbian-wheezy to the laptop's SD card.
4. locate cmdline.txt in the root directory of the SD card. Make a backup copy of it.
5. append to cmdline.txt with "ip=192.168.0.2" without the quotes at the end of the line. save.
6. plug the SD card into pi and turn on. Fire up PUTTY to SSH into 192.168.0.2
You shall be greeted with this screen
Part2 Configure auto login, auto start GUI, auto connect WiFi (to any SSIDs' that are available to me )
First thing first, the order of configuring this 3 components can be done in any order. I prefer to start to configure for WiFi First. This section requires you to connect to pi via SSH.
1. the command to get to the wifi config file: sudo nano /etc/wpa_supplicant/wpa_supplicant.conf
2. append the network related parameters corresponding to the wireless network with the block of code "network {....}". as per the screen shot, my SSID is "Edge", I painted red over my password. Use your own parameters. Replicate the network block to as many SSID you want to include.
3. type in the command sudo nano /etc/network/interfaces follow by the code as per the screenshot.
4. Reboot the pi with sudo shutdown -r now
LO and BEHOLD, you will be greeted with this screen. (*fingers crossed*)
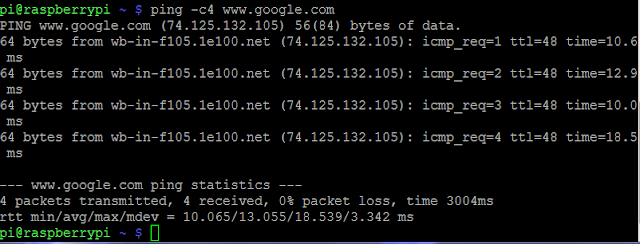
5. Just to ensure the pi is connected to the internet (I have my WiFi network configured prior to configuring the pi), perform a ping as per the screenshot below to verify the connectivity.

6. Here, I am configuring for the autologin using the command sudo nano /etc/inittab , follow by the additional code highlighted in the red box as per the screenshot below
7. Here, I am configuring for the auto start the GUI using the command sudo nano /etc/rc.local , follow by the additional code highlighted in the red box as per the screenshot below
Part3. Internet goodness
1. The very first thing to do with rasberry pi connected to the Internet, is to update the raspbian with this command sudo apt-get update
2. The next thing is to install the virtual keyboard with this command sudo apt-get install matchbox
3. if you have any other software to install, this is the time to do it.
part4. Enjoy
Now i am going commando with my newly configured raspberry pi. you can do the same too!
*note: the 42" LED Toshiba TV, PS3 and controllers, iron, and 5.1 surround speakers are not mine to begin with* I am just another poor and jobless lad, struggling to make ends meet as a starving student.
Can you spot the virtual keyboard used to login to the wifi wall garden (UK only)?


2 comments:
Excellent Guide
I was hoping to use a Raspberry Pi as a cheap Internet access device to read email whilst away from home
My concern was that I needed to have a USB keyboard - bulky and rather large
Your guide has shown me how simple it is to just use a Matchbox sized computer, a mouse and a couple of cables to have an industrial strength computing ultra-mobile device
thanks again
Micky
Oh oh
Seems like it was not so easy as it appeared.
I followed your instructions using my Ubuntu 12.04 laptop (which only has a wired ethernet connection as the wifi is kaput.
I was not sure how to configure my ethernet correctly as each time I ran putty it refused to access the Raspberry Pi
Help !!!
Micky
micky.allen@gmail.com
Post a Comment